Monday, June 27, 2011

The Big Cookie Reveal!

Last week, I posted this picture:

summer teacher vacation cookies margarita watermelon
And I told you the cookies were a surprise for someone very important in my life. Did you guess who that person was???

My mom!

Coincidentally, one of my Mom's former students (she's a 5th grade teacher in TX) was in Florida on vacation with her family. Her Mom saw my temporary Ph.D.-serts & Cakes website and called me. They wanted to bring some surprise cookies back to my Mom! How sweet is that?!

So I decided to do a "Summer Teacher" cookie mix.

summer teacher vacation cookies
She received chalk boards, pencils, watermelon, beach balls, sunglasses, cupcakes, and ice cream cones. When I think of "teacher on vacation," that's what comes to mind!

The best part was that Mom had NO CLUE! *insert evil laugh here* I love being sneaky like that.

Friday, June 24, 2011

Rolled Sugar Cookie Process & a Sneak Peak

People ask me all the time how I bake my sugar cookies so that they don't burn or spread while baking. I've posted my sugar cookie recipe here before, but let's go through my whole process today so you can see it from start to finish.

*Disclaimer: There are MANY different methods to rolling out cookie dough. This method may or may not work for you. It's what works for me. Period.

Step 1: Make Sugar Cookie Dough
I use this recipe from Cooking Light Magazine. I always mix up the dough at least 1 day in advance and store it in the refrigerator so it's nice and chilled when I'm ready to bake.

Step 2: Roll Out Dough
Here are the tools you'll need:
-1 rolling pin (silicone-coated works best)
-nonstick baking spray
-cookie cutters of choice
-SilPat
-1 batch of sugar cookie dough

rolled sugar cookie process how to
Spray SilPat with baking spray and place dough on top. I give my dough a good smoosh with my hand so it's a little easier to roll (remember, it's chilled so it's very hard). Then spray the top of the dough with baking spray.

rolled sugar cookie process how to
Roll out the dough. If it's sticking to your rolling pin, spray the top of the dough again with baking spray. You don't need a perfect rectangle/circle when you roll. In fact, I usually use only 1/4 of the sugar cookie dough (the rest is stored in the fridge) and work on only one side of the SilPat.

rolled sugar cookie process how to
Do you have trouble keeping your dough an even consistency throughout? Try using Wilton's 20-inch rolling pin with guide rings to get an even thickness. Or, place one wooden dowel on either side of your cookie dough and roll on top of that. Both the guide rings and the wooden dowels will only let you go to a certain thickness so you won't get super thin spots in your rolled dough.

Step 3: Cut out Cookies
Using your chosen cookie cutter, cut out your cookies from the rolled dough. Don't cut them too close together, though, because they will spread a little bit while baking.

rolled sugar cookie process how to
Step 4: Tear Away Excess Dough
Peel up the excess dough around the cookie cut-outs. Simple as that! It should come up really easily since you sprayed the SilPat with baking spray. If it gives you trouble in spots, slide a thin spatula underneath it. Of course, be careful not to nudge your perfectly shaped cookie cut-outs.

rolled sugar cookie process how to
Step 5: Repeat Until SilPat is Full
Now, I have to mention here that some people like to freeze the shapes at this point. Then, you could pick them up and move them around the SilPat. This would allow you to fit more shapes on 1 pan and reduce your total amount of baking time.

I'd rather just bake what I can fit on a pan, and continue rolling on another SilPat. When I bake cookies, I have 4 SilPats going at a time so I've always got one ready to go in the oven.

rolled sugar cookie process how to
Step 6: Bake!
Baking time will depend on your oven and the size of your cookie. If I'm unsure how long the cookie size will take to bake, I usually set the timer for 7 minutes and check it then. Your cookie should not be shiny at all when it's finished baking.

That being said, it'll take some practice to know when to remove the cookies from the oven. Ideally, you want to remove them JUST BEFORE the edges start to turn brown. In the image below, two of the cookies are perfect, but the one in the left rear started to get a little brown. A little brown like that is ok because your decorations will probably mask it. Yay!
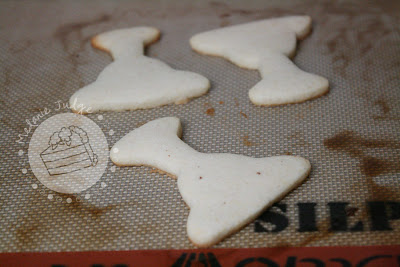
rolled sugar cookie process how to
Let the cookies sit for 1-2 minutes on the pan. This will allow them to harden a little. When they're hard enough to lift (they don't break when you lift them), move them to a cooling rack to cool completely.

Step 7: Repeat!
Just keep repeating the above steps until you've used all your dough. If the dough starts to get too warm, it'll get really sticky. When I'm done working with some dough, I throw it back in the fridge or freezer. The key is to keep it chilled!

Now you may have also noticed in the picture above that after you bake, the baking spray on the SilPat turns brown. Not very appetizing, right?! Well, it won't do much damage. If you roll your dough on top of that, the dough will start to turn brown a little, but it won't change the flavor. If you want to avoid the color change, just wipe the SilPat with a paper towel before you roll dough out on it again.

rolled sugar cookie process how to
So, why was I baking cookies this week? Well, I can't reveal that yet...but I can tell you it was a surprise for one of the most amazing people in my life. Here's a sneak peak of the finished cookies:

margarita cookies sugar decorated
And I have no problem showing you that sneak peak because these margarita cookies actually broke while I was packaging them! So this person won't even receive them...I already ate them! Stay tuned for the big reveal of the rest of the cookie batch and the recipient next week!
Baby Gender Reveal Parties

(Photo from MailOnline.com)

Have you heard of the baby gender reveal parties? I am in love with this idea, and I've been dying to convince my friends to let me bake their gender reveal cake. Ok, let's backtrack. What's a gender reveal party?

Well, this is a trend that's getting more and more popular. Instead of finding out the gender of their baby in the doctor's office during a sonogram, expectant couples ask their doctor to write the gender on a piece of paper and seal it in an envelope. Then, they deliver that envelope straight to their cake baker. The baker decorates the outside of the cake with a gender neutral design...but the inside? Is either PINK or BLUE!

(Photo from iVillage.com)

So the couple picks up the cake and takes it home to a party, usually filled with friends and family. When they cut the cake, everyone discovers at the same time whether they're having a boy or girl!

When Ph.D.-serts & Cakes opens its doors, we will definitely offer this service! In the meantime, if you are pregnant and want to try this, email me! Even if you live outside of Tampa, FL, I have ideas for how we can do this and ship the goods to you!

And, by the way, did you catch the big reveal of Ph.D.-serts & Cakes' website and logo on Facebook this week? If not, check it out at www.phdserts.com. The website is still under construction, but if it's anything like the amazing logo that Allison Anne Stevens Designs created for me, I know it'll be out of this world!

Tuesday, June 21, 2011

Princess Birthday Cake

Last weekend, I made my first cake in Tampa! It was only supposed to feed 25 people, but I hadn't touched a cake in weeks so I went a little overboard. I made it 2-tier, and it probably should have fed about 60 people. But, from what I'm told, there wasn't much cake leftover after the party so I guess they didn't mind!

The cake was for my mother-in-law's boss, Debi, who owns a clothing boutique called the Princess Boutique. They told me they wanted the cake decorated in shades of pink, topped with the Princess tiara, and to somehow incorporate high-heeled shoes.


princess cake silhouette stiletto tiara pink
So there you have it! I decided that using black silhouettes of the stilettos would look the most chic and help to contrast the "little girl" feel that the pinks & tiara were portraying. And I used the new Fabric Fondant & Gum Paste Mold from Wilton that I picked up a couple of weeks ago at the Wilton Food Blogger Workshop (stay tuned to see more of what I'm making with my loot).

But Debi wasn't the only one celebrating a princess' birthday last week! Our puppy Nani turned 4! In dog years, we're the same age now!

dog birthday cookie
Taylor and my mother-in-law brought Nani some goodies, including this adorable ice cream cone cookie for puppies!

dog birthday cookie
Nani was eager to please. Sit! Shake! Lay down!

dog birthday cookie
Then she carried the cookie around the house for a bit...

dog birthday cookie
...and finally settled down and smiled (or snarled?) for the camera.

Happy birthday, Debi & Nani!

Monday, June 6, 2011

Farm-Themed Birthday Cake

It's been quiet on the blog lately. There are a lot of exciting things going on in my life! I'll share some "sneak peeks" with you in a minute, but first let's talk CAKE! Here's a cute cake we just made for a 2nd birthday party.

farm animal boy birthday cake
They wanted it farm animal-themed so I made fondant cows and pigs and stuck them to the sides of the cake.

farm animal boy birthday cake
We also decorated with corn stalks, white fences, a farm tractor, and a huge #2 topper.

farm animal boy birthday cakefarm animal boy birthday cake
So, what's so exciting that it can possibly keep me from updating this blog regularly? Well, it involves moving, opening, birthing, and caking!

My family just relocated to Tampa so I can open my own custom cake shop. The cake shop is already in the works and I'm sure you'll read more about it on this blog. Be sure to stay tuned for the official unveiling of my new logo and website!

And, as you know already, I'm now 25 weeks pregnant with our first child! It's an exciting process and I'm loving every minute of it. Forgive me if setting up my baby girl's nursery occupies more of my time than it should. Some call it nesting...I think I'm just overly excited to welcome her to our family!

Last, but certainly not least, I'm gearing up to attend the Wilton Food Blogger Workshop in Chicago later this week! 27 food bloggers are going to be there, and I think if we find time to sleep, we'll be lucky. They're showing us the test kitchen, we're having cake decorating competitions (I'm game!), we're going to the annual Sidewalk Sale, etc, etc, etc. I'll definitely blog the whole adventure when I get home. There are so many things I'm looking forward to in this trip, but I'm definitely dying to meet the peeps behind Cake Spy and Cupcakes Take the Cake who will also be there! Woohoo! Wilton HQ, here I come!

Wednesday, May 18, 2011

A Casino-Themed Birthday Cake

Here's a fun cake we made for a man's 30th birthday party!

casino roulette poker birthday black red cake
They wanted the cake to be casino-themed so we made a roulette wheel out of Rice Krispies Treats for the topper. The cards and poker chips were made of gum paste and we "glued" them to the cake to make the cake come to life.

They didn't want the cake to specifically say "Happy 30th Birthday!" so we subtly hinted at this birthday milestone. Can you find it? *HINT: You can see it in the picture below if you look very closely.*

casino roulette poker birthday black red cake
ANSWER: The roulette ball came to rest on #30!

Thursday, May 5, 2011

Owl Baby Shower Cake

It seems like we've been doing a lot of baby shower cakes lately! Here's one we created for Betsy, the owner of The Plant Shoppe here in town.

owl baby shower cake
The whole cake was iced in white buttercream and decorated with fondant polka dots. The bow was also made of fondant and rested at the base of the bottom tier.

owl baby shower cake
The owls on the topper were straight from the baby shower invitation! They were printed on icing sheets using a PhotoFrost machine and mounted on gum paste to give them some rigidity.

Cute, simple, and to the point.

And don't you love the name Andrew Joseph?!

Monday, May 2, 2011

Brush Embroidery Lace Wedding Cake

Many brides ask us to replicate the lace pattern on their gown. Of course, there are many ways in which you can do this on a cake, but one way is brush embroidery. We used it on this Rustic Elegant wedding cake back in October 2010. It gives a very elegant, almost-sewn look to the pattern. Want to try it?

-Here's a tutorial by Wilton.
-And here's another video tutorial on YouTube.

This time, however, the cake was covered in white fondant and the brush embroidery was also done with white buttercream. White on white is pretty, but you lose some of the details so I went back and outlined the pattern again with white buttercream to add some definition.

brush embroidery lace wedding cake
The wedding reception was held outdoors at Haile Plantation Golf & Country Club. *Notice the golfer in the background. I'm sure he was gone before the wedding started.*

brush embroidery lace wedding cake
brush embroidery lace wedding cakebrush embroidery lace wedding cake

Wednesday, April 27, 2011

Reese's Peanut Butter Cups Groom's Cake

A couple of weeks ago, we did a wedding and groom's cake at Sweetwater Branch Inn in Gainesville. And now that I think of it, I can't remember what the wedding cake looked like for the life of me! Whoops!

That's ok though. The star of this blog post is the groom's cake. If you follow Mel's Cake Walk on Facebook, this cake will look familiar. I posted a very similar cake by Cup a Dee Cakes almost a year ago as a "Friday Feature."

This bride and groom wanted a close representation of that cake. If you do a google image search for Reese's Peanut Butter Cup Cake, you'll find a bazillion of them. Apparently, there are quite a few Reese's fanatics out there!

For this cake, we created a Reese's Peanut Butter Cups package and left one cup peeking out the opened end of the package. Here's a shot of the cake just after completion in the bakery:


At Sweetwater Branch Inn, the bride left a LOT of Reese's cups for me to spread around the cake. I have to admit that the cups really completed the look of the cake. And they really smelled delicious, but by the time I opened my 200th Reese's cup, I was sick of them! Of course, I still ate the 2 damaged cups on the way back to the bakery...but that's besides the point...

Friday, April 22, 2011

Teddy Bear Baby Shower Cake

This is one of my favorite recent cakes because it was done for a friend. Karen, a good family friend, contacted me and asked me to make a cake for her daughter's baby shower. Of course, everything had to go through Ms Debbie's Sugar Art, but we were thrilled to do the cake!

Karen sent me this photo of the bedspread they're using in the nursery:


How cute is that?! She left the cake design totally up to me and just asked that I use the bedspread as inspiration.

A few days before I made the cake, I created the teddy bear topper out of gum paste. I was so excited with how it turned out that I sent this photo to Karen from the bakery. It's poor quality because I took it on my non-smart, horribly annoying phone...but I think can see the bear pretty well.

boy baby shower teddy bear cake topper
And here's the finished cake!

boy baby shower teddy bear cake
Karen picked up the cake in Gainesville and drove it all the way to Tampa (without incident) for the baby shower. Thank you for letting me do the cake! I really enjoyed it!

boy baby shower teddy bear cake