I love diaper cakes for so many reasons:
1. You don't have to dirty up any dishes to make them.
2. You don't have to fire up the oven.
3. The recipient gets lots of awesome stuff!
4. They're adorable!
So what is a diaper cake? It's basically just a stack of clean, unused (that's an important detail) diapers tied with ribbon and accented with various baby supplies. I like to use size 1 and 2 diapers because I tend to give them at baby showers.
Starting at a short end of the diaper, roll it up and secure it with a rubber band around the middle. When you have quite a few rolled up diapers, stand them on end and assemble them in a circle. Tie a ribbon around the whole thing. This is your bottom tier!
Do the same thing again, but making progressively smaller circles to make the upper tiers. Now you have a basic diaper cake! So easy!
Here is one I made for my friend Amy's second kiddo:
To add some color, I rolled up a blanket and some onesies to replace some of the diapers. I stuck spoons in random places to make the cake look festive and fun. I also hid teething rings and other baby essentials (like Butt Paste) in and around the cake, and I topped the whole thing with an incredibly cute stuffed Elephant I found at Target.
And here's one Nicole & I made for our mutual friend Lourdes*:
We topped this diaper cake with the same adorable stuffed Elephant, and he was wearing a teensy baby hat Nicole knitted (she's awesome).
We added some bottles, rattles, a bottle brush, onesies, and some nursing pads too. See that big box? It's a jumbo box of baby wipes! You can never have enough of those, right??? This is Lourdes' first baby so we knew she needed a lot of the essentials.
Diaper cakes make me smile. Do they do the same to you???
*Lourdes had a healthy baby boy, named Andres Stefan, last Sunday morning! Congrats!
Hello & welcome to my blog! I'll predominantly talk about my experiences with sugar artistry, but I'll probably also talk about everything else I love - family, Nani, soccer, etc. I hope you enjoy perusing the cake pictures as much as I have enjoyed creating them!
Wednesday, March 31, 2010
Tuesday, March 30, 2010
A Patriotic Birthday
I made this cake weeks ago for Ms Debbie's Sugar Art but I've been slow to post the photos. I promise I'll get better about that! The number of cakes I do per weeks has REALLY increased since I've started working with Debbie so I'm trying not to fall behind on posting them.
Anyway, here's one for a 7-year old boy who apparently loves his country. They wanted patriotic colors, camo t-shirts, grenades, camo helmets, and dog tags.
It was a fun cake to make. I really like the look of the mod-looking polka dots on the top tier. And the stripes on the bottom tier make what could have been a serious military cake a slightly whimsical one. Appropriate for a 7-year-old, don't you think?
Hope your birthday was a great one, Christian!
More Marshmallow Fun
So now that we've made a TON of homemade marshmallows, what do we do with them?
There's always the old stand-by...S'mores! Think about it. A banana-flavored marshmallow melted on a bed of dark chocolate between two graham crackers. Wow. Or wait! Smear a little peanut butter on one of the graham crackers...now you're talking!
Or we could simply dip some of the marshmallows in chocolate - yummy!
What else comes to mind? Rice Krispie treats, of course!
How about watermelon-, raspberry-, and key lime-flavored Rice Krispie treats? Most Rice Krispie recipes call for 16 ounces of marshmallows so just weigh your flavored ones out and continue with the recipe.
Have you ever swirled marshmallows in brownie batter before baking? Trust me, it's delicious. Now, try it with raspberry-flavored marshmallows. Make the brownies according to the recipe (or instructions on the box, in my case) and pour the batter into a pan. Then, melt your flavored marshmallows. Pour the melted marshmallow on top of the brownie batter and use a butter knife to swirl them together. Then bake according to the recipe's instructions.
And for those of you who feel ambitious, make some marshmallow fondant.
Here's how:
16 oz. marshmallows
2 lb. confectioner's sugar
2 Tbsp. water
shortening, for coating hands and work surface
Place marshmallows and water in a microwave-safe bowl, and microwave at 30 second intervals until completely melted. Place half of the confectioner's sugar in the bowl of a stand mixer fitted with the paddle attachment. Pour the melted marshmallows into the mixing bowl and mix until incorporated. Gradually add the remaining sugar. (Switch to the dough hook if your fondant gets too thick for the paddle.) Remove the fondant from the mixer and knead a few times. Wrap tightly in plastic wrap and allow it to cool completely before using.
*This recipe can be easily halved if you want to make smaller batches of fondant.
Then, use this marshmallow fondant to decorate sugar cookies! I like to apply a thin coat of buttercream icing to the cookie (adds flavor and helps the fondant stick) and then add the fondant. Be creative! Here, I've decorated my cookies with raspberry, coconut, banana, and plain marshmallow fondant.
And now for those of you who enjoy unnecessary challenges in life, try making some marshmallow mints!
If you do this, you won't let your marshmallows set up in the refrigerator in a pan. Take the fresh marshmallow mixture that you've flavored with peppermint extract straight out of your stand mixer and follow these steps:
Step 1: Using a clean paint brush (that has never been used on paint!) and gel/paste food colors, stripe a piping bag that has been fitted with a tip 12. Just paint 3 stripes up the sides of the bag.
Step 2: Fill the bag with your warm marshmallow mixture.
Step 3: Squeeze some of the mixture through the tip into a separate bowl until you see your color stripes beginning to appear. Then begin to pipe polka dots on a cookie sheet lined with wax paper. (Learn from my mistake: Dust your wax paper with confectioner's sugar. It will be a WHOLE lot easier to remove them when they're chilled.)
Step 4: Dust the marshmallow mints with confectioner's sugar and cool until set, minimum 3 hours.
Be careful when flavoring these marshmallows. The LorAnn's peppermint oil is strong! Adam says my marshmallow mints are "curiously strong" like Altoids. Nice!
There's always the old stand-by...S'mores! Think about it. A banana-flavored marshmallow melted on a bed of dark chocolate between two graham crackers. Wow. Or wait! Smear a little peanut butter on one of the graham crackers...now you're talking!
Or we could simply dip some of the marshmallows in chocolate - yummy!
What else comes to mind? Rice Krispie treats, of course!
How about watermelon-, raspberry-, and key lime-flavored Rice Krispie treats? Most Rice Krispie recipes call for 16 ounces of marshmallows so just weigh your flavored ones out and continue with the recipe.
Have you ever swirled marshmallows in brownie batter before baking? Trust me, it's delicious. Now, try it with raspberry-flavored marshmallows. Make the brownies according to the recipe (or instructions on the box, in my case) and pour the batter into a pan. Then, melt your flavored marshmallows. Pour the melted marshmallow on top of the brownie batter and use a butter knife to swirl them together. Then bake according to the recipe's instructions.
And for those of you who feel ambitious, make some marshmallow fondant.
Here's how:
16 oz. marshmallows
2 lb. confectioner's sugar
2 Tbsp. water
shortening, for coating hands and work surface
Place marshmallows and water in a microwave-safe bowl, and microwave at 30 second intervals until completely melted. Place half of the confectioner's sugar in the bowl of a stand mixer fitted with the paddle attachment. Pour the melted marshmallows into the mixing bowl and mix until incorporated. Gradually add the remaining sugar. (Switch to the dough hook if your fondant gets too thick for the paddle.) Remove the fondant from the mixer and knead a few times. Wrap tightly in plastic wrap and allow it to cool completely before using.
*This recipe can be easily halved if you want to make smaller batches of fondant.
Then, use this marshmallow fondant to decorate sugar cookies! I like to apply a thin coat of buttercream icing to the cookie (adds flavor and helps the fondant stick) and then add the fondant. Be creative! Here, I've decorated my cookies with raspberry, coconut, banana, and plain marshmallow fondant.
And now for those of you who enjoy unnecessary challenges in life, try making some marshmallow mints!
If you do this, you won't let your marshmallows set up in the refrigerator in a pan. Take the fresh marshmallow mixture that you've flavored with peppermint extract straight out of your stand mixer and follow these steps:
Step 1: Using a clean paint brush (that has never been used on paint!) and gel/paste food colors, stripe a piping bag that has been fitted with a tip 12. Just paint 3 stripes up the sides of the bag.
Step 2: Fill the bag with your warm marshmallow mixture.
Step 3: Squeeze some of the mixture through the tip into a separate bowl until you see your color stripes beginning to appear. Then begin to pipe polka dots on a cookie sheet lined with wax paper. (Learn from my mistake: Dust your wax paper with confectioner's sugar. It will be a WHOLE lot easier to remove them when they're chilled.)
Step 4: Dust the marshmallow mints with confectioner's sugar and cool until set, minimum 3 hours.
Be careful when flavoring these marshmallows. The LorAnn's peppermint oil is strong! Adam says my marshmallow mints are "curiously strong" like Altoids. Nice!
Cake Walk is on Facebook!
I've just finished creating a Facebook Fan Page for this blog. Check it out here and become a fan! Also, be sure to leave a comment about what you'd like to see there.
Monday, March 29, 2010
Homemade Marshmallows with a Colorful Twist
After reading all of your comments on the cotton candy giveaway post, I was inspired to make my own cotton candy with some of the flavors you mentioned! But...I figured homemade cotton candy would be pretty difficult. So as a warm-up, I decided to make homemade marshmallows.
People have been making homemade marshmallows for years so it's nothing new...
...but what if we add some color and fun flavors?!
Right to left: raspberry, banana, coconut, watermelon, and key lime marshmallows!
They're easy & fun to make, and they taste so good!
I used this recipe from Smitten Kitchen:
About 1 cup confectioners’ sugar, for dusting
3 1/2 envelopes (2 tablespoons plus 2 1/2 teaspoons) unflavored gelatin
1 cup cold water, divided
2 cups granulated sugar
1/2 cup light corn syrup
1/4 teaspoon salt
2 large egg whites or reconstituted powdered egg whites
1 tablespoon vanilla (or 2 teaspoons almond/mint extract or 1 teaspoon LorAnn concentrated oils)
food coloring, for tinting
1. Combine sugar, 1/2 cup cold water, corn syrup, and salt in a medium saucepan over medium heat.
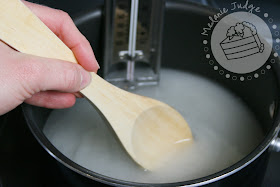
2. Stir with a wooden spoon until the sugar is dissolved.
3. Continue to heat, without stirring, until the mixture reaches 240 degrees F on a candy thermometer. At first, you will see small bubbles forming around the edges of the pan.
Then, larger ones will start to appear.
And before too long, the whole pot will be boiling!
When the temperature reaches 240 degrees F (which may take up to 12 minutes), you're ready for the next step. This temperature is also called the "soft ball" stage.
4. Meanwhile, beat 2 large egg whites until stiff peaks form.
5. Also, prepare your pan by spraying it liberally with cooking spray and then dusting with powdered sugar. Marshmallows are very sticky so make sure you cover every inch of your pan with powdered sugar!
6. And, sprinkle the gelatin over 1/2 cup cold water in the bowl of a stand mixer (not shown). Let the gelatin and water sit, without stirring, while you wait for the sugar mixture to reach 240 degrees F.
7. When the sugar mixture is ready, carefully pour it over the gelatin mixture. You will immediately see foam & bubbles appear like in the picture above.
8. Start beating the mixture slowly with the paddle attachment. When the ingredients are incorporated, increase the mixing speed to high. Beat until the mixture is thick, white and almost tripled in size.
9. Mix in the egg whites, and add flavoring and food coloring, if desired.
10. Working quickly, pour the marshmallow mixture into the prepared pan.
11. Dust the tops of the marshmallow with more powdered sugar. Cool in the refrigerator for 3 hours or up to 1 day.
12. Run a knife along the edge of your pan and invert the marshmallow onto a cutting board. Cut it into 1-inch square pieces. Then toss each square in more powdered sugar to coat.
So now that we have these fabulous marshmallows...what should we do with them?! Oh, I have so many ideas! I'll post them tomorrow. In the meantime, go make some marshmallows!
Saturday, March 27, 2010
Organic Cotton Candy Winners!
It's time to announce the THREE cotton candy winners! Each of them will be able to choose which flavor they'd like to try - grape or cherry vanilla. Yummy!
The first winner is....
Comment #62: Angie Lilly
The second winner is...
Comment #95: theolotto
And the final winner is...
Comment #75: Scott
The first winner is....
Comment #62: Angie Lilly
ooo I think Peppermint would be nice! Not like candy cane peppermint but like real peppermint!
March 26, 2010 9:35AM
The second winner is...
Comment #95: theolotto
I'd like to try the cherry vanilla.
March 26, 2010 11:41PM
And the final winner is...
Comment #75: Scott
hmmm green apple would be good...or lemonade!All winners were chosen by random.org. Thank you all for entering! Stay tuned for a boat load of cake photos and a fun, homemade Easter idea - all coming your way ASAP!
March 26, 2010 10:00AM
Tuesday, March 23, 2010
A Golden Ticket Opportunity from Sucre!
Oh, I'm so excited! I'm giddy! I just found out about this Golden Ticket opportunity from Sucre. Remember the New Orleans bakery who sent me the amazing King Cake before Mardi Gras?
For Easter, they're selling extra large hollow milk chocolate eggs with a surprise inside! The eggs all have a special coupon...but ONLY ONE will have the GOLDEN TICKET!
What's the Golden Ticket for?
One lucky winner will get the chance to experience a fun filled day at the premiere confectioner of New Orleans and discover what it’s like to be an actual pastry chef!
*Gasp* That's AWESOME!
Every year for Christmas, I get Adam scratch-off tickets for his stocking. I just keep thinking that either it could be simply a fun gift (everyone loves scratch-offs, right?) or it could be the best stocking stuffer ever if he wins lots of money! This year, I included all the family members who were in town for the holidays. Grandpa won $40, and Adam won $50! Nice!
So I just ordered Adam an egg from Sucre. If he had such a lucky Christmas, maybe he'll win the Golden Ticket at Easter! And...maybe he'll be the sweet husband I know he is and give that Golden Ticket to me...
Friday, March 19, 2010
Organic Cotton Candy Giveaway!
My birthday was last Saturday. And so far, it's been a pretty amazing birthday month! I've won some cake decorating medals & ribbons, finished the Disney Princess Half Marathon, started working full time at Ms. Debbie's Sugar Art, and spent my birthday with family members I see only once or twice a year. Right about the time that I was thinking "How could this month get any better?" I opened my email to find out I had won an online giveaway from Fabulous Fun Finds!
For what?
ORGANIC COTTON CANDY!
I'm a cotton candy addict. I can't go to a sporting event or carnival without getting some. Rita's has some absolutely amazing cotton candy Italian ice. (They're giving away free ice on March 20th, by the way!) And when we go to TCBY, I always get a parfait with cotton candy yogurt, butterfinger, and cookie dough. Yummy!
So I was MORE than thrilled when I found out I'd won. And then I found out that I won a WHOLE CASE - 12 bags - of cotton candy! What the...??? Awesomeness.
So, yes, I love cotton candy...but I also love sharing! So I'm going to give away 3 of them to you guys! I'm keeping 9 for myself (well, I've already eaten 2 to be honest)...is that selfish? I can live with that.
To enter, just leave a comment on this post with what flavor you'd like to see available as cotton candy. The winners will be chosen using random.org and will have their choice of Grape or Cherry Vanilla Organic Cotton Candy from Spun City. They're both fabulous!
Extra entries:
1 entry - Be a Cake Walk follower.
1 entry - Subscribe to Cake Walk's RSS feed.
1 entry - Add the Cake Walk button to your blog.
3 entries - Make a post about this giveaway on your own blog/twitter account/facebook/etc.
Leave one comment per entry please. As always, make sure you either include your email address with your comment or post it in your profile so I can contact you if you win. The giveaway (open to US only) will end Friday, March 26th at midnight eastern time. Good luck!
Sunday, March 14, 2010
Fondant Lace Tutorial
By request*, today I'll show you how to successfully make fondant lace pieces for your cakes!
There are many ways to use fondant lace, but here's how I've used it recently:
Materials You'll Need:
Step 1: Roll the fondant into a thin sheet, between 1/8 and 1/16 of an inch thick. You may need to lightly dust your work surface with powdered sugar to keep the fondant from sticking.
Step 2: Trim edges of fondant sheet so it's easier to work with.
Step 3: Carefully lift the fondant sheet and place it on the lace mold.
Step 4: Firmly press the fondant into the lace mold, being careful not to stretch it.
Step 5: Firmly roll over the fondant to press it further into the lace mold. I like to roll from the center upwards and then from the center downwards. Its important not to stretch the fondant or move it on the lace mold in this step. If the fondant shifts, you will get a second lace mold impression.
Step 6: Carefully lift the fondant off of the lace mold and place it on your work surface. If you do not see a clean, crisp lace impression in the fondant at this time, re-knead the fondant and start again.
Step 7: Using a sharp knife, trim around the edges of your fondant impression. Use your imagination here! You do not have to abide by the lines of the lace mold. You can use just tiny pieces from the impression, cut more holes out of it, etc.
I find it easiest to trim the piece if I put a finger on each side of the knife. That keeps the fondant from sliding or bunching while the knife cuts through.
Now your fondant lace piece is ready to be applied to your cake! If you're applying it like I did on the cake above, paint a little bit of water on the cake and then carefully lay the fondant lace piece on it.
Here are a couple of other examples for how to use your lace pieces:
A lace patchwork cake from Earlene Moore.
Another lace cake from Classic Confection Cakes.
*Roxanne, thanks for your question!
There are many ways to use fondant lace, but here's how I've used it recently:
Materials You'll Need:
- fondant, kneaded until soft
- rolling pin
- sharp knife
- lace mold (my molds are from Caljava)
Step 1: Roll the fondant into a thin sheet, between 1/8 and 1/16 of an inch thick. You may need to lightly dust your work surface with powdered sugar to keep the fondant from sticking.
Step 2: Trim edges of fondant sheet so it's easier to work with.
Step 3: Carefully lift the fondant sheet and place it on the lace mold.
Step 4: Firmly press the fondant into the lace mold, being careful not to stretch it.
Step 5: Firmly roll over the fondant to press it further into the lace mold. I like to roll from the center upwards and then from the center downwards. Its important not to stretch the fondant or move it on the lace mold in this step. If the fondant shifts, you will get a second lace mold impression.
Step 6: Carefully lift the fondant off of the lace mold and place it on your work surface. If you do not see a clean, crisp lace impression in the fondant at this time, re-knead the fondant and start again.
Step 7: Using a sharp knife, trim around the edges of your fondant impression. Use your imagination here! You do not have to abide by the lines of the lace mold. You can use just tiny pieces from the impression, cut more holes out of it, etc.
I find it easiest to trim the piece if I put a finger on each side of the knife. That keeps the fondant from sliding or bunching while the knife cuts through.
Now your fondant lace piece is ready to be applied to your cake! If you're applying it like I did on the cake above, paint a little bit of water on the cake and then carefully lay the fondant lace piece on it.
Here are a couple of other examples for how to use your lace pieces:
A lace patchwork cake from Earlene Moore.
Another lace cake from Classic Confection Cakes.
*Roxanne, thanks for your question!