A few months ago, Wilton introduced a new product, the Button Flower Fondant Cut & Press Set, for creating cute, whimsical flowers. I'm ashamed to say that I never tried it because the packaging didn't make it completely clear how to use the product. I don't know about you, but money doesn't grow in my backyard so I have to pick & choose what to buy. However, I recently saw this product used during a demonstration, and I love it! The flowers it makes are fun, flirty and perfect for a girl's cake - from a baby to an adult!
Supplies you'll need:
Wilton Button Flower Fondant Cut & Press Set
small rolling pin
Wilton Flower Forming Cups
shortening
Fondant, Gumpaste, or 50/50 Fondant/Gumpaste colors of your choice (referred to as fondant for this tutorial)
1. Roll fondant to 1/8-inch thickness.
2. Using the underside of the cutter set, cut out one rectangular shape from the rolled fondant.
3. Spread a little bit of shortening on the top of the rectangle. The shortening will (hopefully) cause the fondant to stick to the correct side of the cutter.
4. Open the cutter set. Place the fondant piece shortening-side-down on top of the smooth side of the flowers cutters.
5. Place the cutter piece with the textured flowers on top and press down firmly and evenly.
6. Reopen the cutter set. If you're lucky, the shortening will hold the cut-out pieces to the smooth side of the cutter set. Here, I was lucky with only one (left-hand side) of the 3 pieces that were cut.
Left: Button center cut from fondant and excess fondant that can be removed and saved for later use.
Right: Two flowers cut from fondant in the textured side of the cutter set.
7. If some of your pieces get stuck in the textured side of the cutter set, simply ease the flowers up, petal by petal, using a straight pin. Any pin pricks you make will be on the back side of the flower so no one will ever notice them.
Here, you can see the flowers and button cut from the fondant and the closed cutter set. Notice the cute stripes and polka dots on the flowers!
8. Cut more flowers and button centers from different colored fondant and mix & match them to create fun, colorful flowers. Place the large flower in the large flower forming cup and the small flower in the small flower forming cup. Place a small drop of water in the middle of the small flower and attach the button center.
9. When the flowers are dry, place a small drop of water in the middle of the large flower and attach the smaller flower with the button center.
To show you how super cute they are, here is a cake I made recently:
These flowers are perfect for a tween's birthday cake, don't you think?
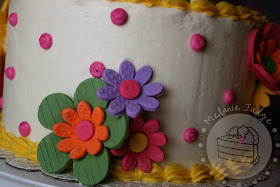
Don't you just love them!?
Definitely money well spent!
And, I want to especially thank Mikkel for making my new watermark logo. It's sad to say, but Mikkel has actually had one of her cake photos stolen. With the new watermark in place, it'll make it that much harder for someone to copy a photo and try to take credit for the work. Check out Mikkel's blog. She's an amazing photographer, scrapbooker, and cake decorator!
Hello & welcome to my blog! I'll predominantly talk about my experiences with sugar artistry, but I'll probably also talk about everything else I love - family, Nani, soccer, etc. I hope you enjoy perusing the cake pictures as much as I have enjoyed creating them!
Friday, January 29, 2010
Sunday, January 24, 2010
Cookbook Giveaway Winner!
Folks, we have a winner! Comment #16 was chosen by random.org. Congratulations, Becky!
Becky said...
Becky said...
Thursday, January 21, 2010
Make-Ahead Meals for Busy Moms - Baked Chimichangas
Earlier this week, I told you that I made a few dishes from Jane Doiron's new cookbook, Make-Ahead Meals for Busy Moms. The first one I shared with you was the Mini Bacon Quiches. Yummy! Today, I'll show you her Baked Chicken Chimichangas. SUPER yummy!
Here's what you'll need:
3 tablespoons olive oil, divided
1 1/2 lbs. chicken breast, cut into bite-sized pieces
1/2 teaspoon salt
1/2 teaspoon ground black pepper
1/2 cup onions, diced
1/2 cup green bell pepper, diced
1 teaspoon ground cumin
1/2 teaspoon cayenne red pepper
1/2 teaspoon dried oregano
1/2 cup thick and chunky salsa (mild or medium)
8 (8-inch) flour tortillas
2 cups four cheese Mexican shredded cheese
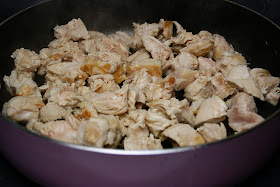
In a large skillet with 2 tablespoons of olive oil, brown the chicken on medium-high heat until no longer pink.
Season the chicken with salt and pepper. Place the cooked chicken in a bowl. Reduce the heat to medium and add 1 tablespoon of olive oil to the skillet. Saute the onion, gren pepper, cumin, cayenne pepper, and oregano until tender.
Add the chicken back to the pan and cook until heated through, stirring often. Stir in the salsa and heat for one minute. Set the pan aside.
Preheat the oven to 400 degrees F. Spray a large sheet pan with nonstick spray; set aside. Heat the stack of tortillas between 2 damp paper towels in the microwave for 20-40 seconds on high to make them easier to bend. For each chimichanga, place 1/2 cup of the chicken mixture in the center of the tortilla. Sprinkle 1/4 cup of the cheese on top. Fold in the opposite sides of the tortilla over the chicken mixture. Roll up the tortilla, enclosing the mixture, and place it seam-side down on the sheet pan. Make the rest of the chimichangas and place them on the sheet pan. Spray the tops of the chimichangas with nonstick spray. Bake 10 minutes. Serve with sour cream.
To freeze: Cover and refrigerate the chicken mixture. When completely cooled, place mixture in a labeled freezer bag. The flour tortillas can be frozen separately. Keep frozen up to 3 months.
To make things even easier, I froze the chicken mixture in little foil-wrapped packets where each packet had enough chicken mixture for one chimichanga. And, as you can see from the photos above, we added a little more melted cheese and salsa to the tops of ours. Delicious!
Enter for a chance to win a copy of Jane's awesome cookbook by clicking here. Giveaway ends Saturday, January 23rd!
Wednesday, January 20, 2010
A Lost Cake and a Great Day!
Yesterday was a great day! What's so special about January 19th? Well, first of all, it's my hubby's birthday! And second...I GOT A JOB! Yay!
First things first: Adam's birthday cake
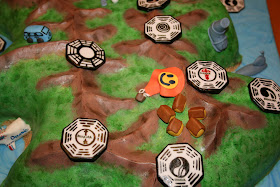
Last year, Adam didn't want me to make him a birthday cake. He's not a big cake person...but...I make cakes! I make cakes for everyone else...shouldn't my husband get one?! This year, however, he really got into it! He designed his own cake and did all the necessary research for it. Adam's favorite television show is Lost so he wanted a cake representation of the island, equipped with miniature symbols of important events & plot twists. He scoured the internet to get me maps and photos of everything so I could recreate them in sugar.
I saved all the decorating for Tuesday so I could do it while he was at work. By the time he came home, I had a fully decorated island...and he loved it! (Phew!)
The cake was carved from two side-by-side 13x9-inch cakes and then crumb coated in buttercream. To create the mountains, I made fondant snakes and laid them on top of the island. Then, I covered the whole thing in green fondant. Working quickly, I went back and pinched the mountain tops between my fingers to create peaks here and there.
I hand-painted the mountains with 3 different shades of brown and the island with 3 different shades of green food coloring. The "beaches" were made of ground Ritz crackers (I would have used Graham crackers, but didn't have any on hand.) and brown sugar.
All of the miniature elements and Dharma symbols were made from fondant and hand-painted with food coloring. The island had the 4-toed foot, the submarine, the tail crash site, the fuselage, the Elizabeth, a golf club & ball to represent the golf course, the barracks, the Dharma van, Henry Gail's hot air balloon, and 9 Dharma symbols!
He said this was the best birthday cake he's ever gotten. But, frankly, I think he's finally learned that flattery (and not criticism) is the way to make me happy after a long day of hard work. *grin* Anyway, happy birthday, Adam!
The second thing on the agenda: My new job!
Over the past couple of months, I have been in contact with a local cake decorator about future employment. Yesterday, she officially hired me! I'm really excited to see what my sugary future holds! And on the way home from meeting with her, I called Adam and said, "Happy Birthday, your wife just got a job!" To celebrate...I think I'll do a little shopping this afternoon...
So, yesterday was a great day for us! And today is also a great day because it's Adam's Mom's birthday. Happy Birthday, Leona!
Monday, January 18, 2010
Cookbook Review & Giveaway!
A couple of weeks ago, Jane Doiron sent me a copy of her new cookbook to review and give away. The fresh-off-the-presses cookbook is called Make Ahead Meals for Busy Moms, and I absolutely love it.
In the introduction, Jane explains that, like the rest of us, she has a busy life! Time is precious. So, she's transformed some really tasty recipes into meals that can be made ahead of time and frozen until you're ready to eat them.
To review the cookbook, I decided to test 2 dinners, 1 appetizer, and 1 dessert. This was enough food for my husband and I to eat for the whole week! And best of all, I was able to prepare everything in one afternoon. In a matter of hours, I had enough dinners for the entire week ready to go. Amazing!
The recipes I tested were delicious! And what I love even more about this book is that with a little practice, I can hope to apply some of the same "prep & freeze" techniques to my own family favorites.
The first recipe I tested was Mini Bacon Quiches. Honestly, I tested this recipe to see if it pleased my hubby's super-critical palette. He loves bacon, but he is a very picky eater! If he likes the Mini Bacon Quiches, the recipe is a keeper for sure!
Mini Bacon Quiches
1 package (15 oz.) refrigerated pie pastry
1/2 lb. bacon, cut into 1/2-inch pieces
1/2 cup ricotta cheese
1/2 cup cheddar cheese, shredded
1/2 cup Swiss cheese, shredded
1 egg
1 large garlic clove, minced
1/8 teaspoon black ground pepper
2 tablespoons flour
A Day Ahead:
Remove the pie pastry from the refrigerator and bring to room temperature. Cook the bacon and drain on paper towels.
Oh yea, now we're talking...smell that bacon cooking!
Here's the cooked bacon...ignore the burned parts. I'll be honest, I'm not the best cook. Baking is definitely my forte. And I happen to know that Rachel Ray is the exact opposite! She can cook just about anything, but ask her to make cookies or a cake and she's lost.
In a medium bowl, mix the bacon, ricotta, cheddar cheese, Swiss cheese, egg, garlic, and pepper.
Sprinkle the counter with flour. Unfold one pie crust and lay flat on flour dusted counter. Use a 2 1/2-inch round cutter to cut out 12 circles of dough. Repeat the same procedure with the second pie pastry.
Press each piece of dough into the bottom and sides of a mini muffin cup.
Fill each cup evenly with the cheese mixture.
Cover tightly with plastic wrap and refrigerate.
Cooking Directions:
Remove the muffin trays from the refrigerator 30 minutes before cooking. Remove the plastic wrap and bake at 400 degrees F for about 17 minutes or until the cheese is golden brown. Cool on a wire rack. Serve hot. Makes 2 dozen.
Ok, I cheated a little here. I actually stuck the whole tray in the freezer for about an hour, until the quiches were frozen solid. Then, I threw them in a zip-top bag and put them back in the freezer. I pull a few out & bake them on a cookie sheet for an appetizer before dinner or for a small breakfast on the weekends. They're so yummy, and YES, Adam loves them!
If you liked that recipe, you'll love Jane's cookbook! You can purchase it on Amazon.com and enter to win one here. The book is packed full of recipes that are simultaneously family friendly and taste bud pleasing. It is organized in a logical manner with sections for appetizers, breakfast & brunch, dessert, main dishes, side dishes, and soup. And, BONUS, there is a table in the back with unit conversions and an index of recipes so you can find what you need quick!
To enter to win a copy just by leaving a comment on this post telling me your favorite time-saving tip (and it doesn't have to be for in the kitchen). I can't wait to read them!
The giveaway will end Saturday, January 23, 2010 at midnight EST. Good luck!
Clutch Purse Giveaway Winner!
Thank you to everyone who entered the giveaway last week. 167 entries is the highest so far - yay! The winner was chosen using random.org so without further ado...the winner is...*drum roll*...Comment #159...missrantsypants!
missrantsypants said...
Stay tuned for another great giveaway this week - a fabulous cookbook called Make-Ahead Meals for Busy Moms. I'm excited about this one!
missrantsypants said...
"I like the Whimsical Notepad"
January 15, 2010 8:14pm
Stay tuned for another great giveaway this week - a fabulous cookbook called Make-Ahead Meals for Busy Moms. I'm excited about this one!
Wednesday, January 13, 2010
PHinally Done!
I am PHinally Done with my graduate research! While obesity researchers still have a world of things to discover, I am finished. I'm on to bigger and better things - making cakes! What? You think that's ironic? Well....maybe. But what would the world be without cakes?! Someone's got to make them, and I volunteer for the job!
Cakes are good for you. Maybe not for your waistline, but they're good for your spirit, your emotions, your overall well-being. I could go into the scientific explanation behind it but why don't you just...
...trust me, I'm a doctor.
I've been dying to say that! If you haven't seen the Dr. Pepper commercials, check this one out. Dr. Pepper is my favorite soda so it's only appropriate that I steal their slogan, right?!
To celebrate my graduation from the University of Florida and my sister's graduation from the University of North Texas, we had a big party with lots of friends and family. This is the first time the whole Mitchell family has been together in at least 15 years!
I was lucky enough to graduate with two of my really good friends, Nicole & Shelby. At one point during the party, Shelby realized that we were all holding the things currently ranked #1 on our "wish list" for life. I was holding Lorelei (James' and Elise's adorable daughter); Nicole was holding Nani; and Shelby was holding a glass of wine! Of course, we had to document the coincidence with a photo, and I absolutely love it!
The party really wore Nani out. She usually doesn't relax enough to close her eyes while we have visitors over, but we caught her falling asleep in the middle of the dining room while the house was still full of people. And, by the way, don't you just love her little shirt? My sister gave it to me for my birthday last year. So cute!
Before all the family came into town, Elise & I went to campus to take some graduation portraits. I had decorated a dummy cake to use in the photos...I guess my idea was to symbolize my transition from obesity research to cake decorating. Whether or not we succeeded in getting that point across, I am thrilled with the photos.
The cake and the party invitation, which was hand-made by Nicole (she's awesome!):
Some shots with the Bull Gator:
The school mascots, Albert & Alberta:
And the stadium!
This next one might be my favorite photo of the day. I hate my feet...but I just love how this photo came out! Elise has such an amazing eye for photography! Would you believe she's self-taught?! I'm so happy she captured such an important time in my life, and even happier to call her a friend.
To see more photos from the shoot, check out Elise's blog by clicking here and here.
Now time for the sappy stuff. This is your warning. If you despise acceptance speeches and things like that, stop reading now. You've been warned.
For those of you still with me, I want to publicly thank all the people who have supported me. I dedicated my dissertation to my husband Adam for so many reasons. He was a quiet listener when I had to get something off my chest and helped me put things back into perspective. Through everything, he has been a shoulder to cry on, a hand to hold, and a best friend to laugh with. Mom and Dad, you've always been my biggest - and loudest - fans. I hear your cheers, and they're what keep me going. Robin, I'm so proud of you for your graduation and accomplishments. I'm so glad we got to share this graduation party!
My grandparents (both paternal and maternal), my extended family, Adam's parents, and Adam's extended family were always interested in how many rats I had to feed each day. Throughout my life, they have all supported my every decision and believed I could accomplish anything I set my mind to.
My lab members were, of course, crucial to my scientific progress, but some of them also became great friends. Mike, JJ, and Lourdes - you guys are da bomb. The A Team rules!
And last, but not least, I want to thank the members of my Girls' Night group for helping me escape from the world of science every once in a while. Even though the conversations often turned back to science during our outings, it was nice to vent out frustrations and celebrate accomplishments with a good group of friends.
The crockpot is my weeknight must-have! So easy and quick, and I don't have to think about making supper when I get home from work.