Supplies you'll need:
Wilton Button Flower Fondant Cut & Press Set
small rolling pin
Wilton Flower Forming Cups
shortening
Fondant, Gumpaste, or 50/50 Fondant/Gumpaste colors of your choice (referred to as fondant for this tutorial)


1. Roll fondant to 1/8-inch thickness.

2. Using the underside of the cutter set, cut out one rectangular shape from the rolled fondant.
 3. Spread a little bit of shortening on the top of the rectangle. The shortening will (hopefully) cause the fondant to stick to the correct side of the cutter.
 4. Open the cutter set. Place the fondant piece shortening-side-down on top of the smooth side of the flowers cutters.
5. Place the cutter piece with the textured flowers on top and press down firmly and evenly.
 6. Reopen the cutter set. If you're lucky, the shortening will hold the cut-out pieces to the smooth side of the cutter set. Here, I was lucky with only one (left-hand side) of the 3 pieces that were cut.
Left: Button center cut from fondant and excess fondant that can be removed and saved for later use.
Right: Two flowers cut from fondant in the textured side of the cutter set.
 7. If some of your pieces get stuck in the textured side of the cutter set, simply ease the flowers up, petal by petal, using a straight pin. Any pin pricks you make will be on the back side of the flower so no one will ever notice them.
 Here, you can see the flowers and button cut from the fondant and the closed cutter set. Notice the cute stripes and polka dots on the flowers!

8. Cut more flowers and button centers from different colored fondant and mix & match them to create fun, colorful flowers. Place the large flower in the large flower forming cup and the small flower in the small flower forming cup. Place a small drop of water in the middle of the small flower and attach the button center.
9. When the flowers are dry, place a small drop of water in the middle of the large flower and attach the smaller flower with the button center.
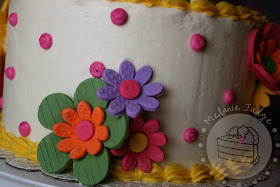
To show you how super cute they are, here is a cake I made recently:
 These flowers are perfect for a tween's birthday cake, don't you think?
Don't you just love them!?

Definitely money well spent!
And, I want to especially thank Mikkel for making my new watermark logo. It's sad to say, but Mikkel has actually had one of her cake photos stolen. With the new watermark in place, it'll make it that much harder for someone to copy a photo and try to take credit for the work. Check out Mikkel's blog. She's an amazing photographer, scrapbooker, and cake decorator!
The flowers are very cute! I love your watermark too! Good job, Mikkel!
ReplyDeleteMakes me want to create a watermark out of my logo instead of just the boring text I use.
:)
Thanks for taking us throught the process. I was given this as a gift from a family member who just knows I like to bake and decorate cakes. At first I wasn't sure that I really cared to the style - but I really do catch the vision through the example above. Nice.
ReplyDeleteThis cake is so cute! And I love the new logo!!
ReplyDeleteVery cute cake! Would definitely bring a smile to any birthday girl's face :).
ReplyDeleteThank you so much, Melanie! Awesome tutorial btw and the watermark looks awesome!
ReplyDeleteI just tried using my this weekend, how long does it take the flowers to dry once they are in the forming cups? It's been 24 hrs and they are still too soft. Thx =)
ReplyDeleteI'm not sure how long the fondant will take...could be as long as a couple of days, especially if the humidity is high. Gum paste and 50/50 mixtures should dry faster though!
ReplyDeleteThe flowers are so cute. Your cake turned out very beautiful. Thanks for sharing.
ReplyDelete