*Dramatic Pause*
Bridgeless Stringwork!
If you need a catch-up, read the Basic Stringwork and Stringwork with a Bridge tutorials first. Again, I am working on a fondant-covered cake. And as discussed before, it will be much easier for you to work with white fondant and white royal icing. I am using different colors so the photos show up clearly for you.
Step 1: Insert Pins Into Cake

Plan your stringwork design ahead of time so you know where to put the pins. These pins will support your strings until they dry. Once they're dry, you'll remove the pins and have strings that stick out from the cake - like they're defying gravity!

When I get all the pins in place, I gently push them with my finger so they're all lined up nicely. Here's a good view for you:

Step 2: The Drop String Base
Pipe drop strings across your pins using a tip 3. If you need tips on icing consistency, go to the Basic Stringwork tutorial.
Today, my design is divided into 3 sections so I piped 3 drop strings with the middle one being slightly longer than the other two.


Here are the finished strings from the front:

And from above:

So the key here is to let the strings drop on the pins so that they're not touching the cake. The strings should only touch the cake at the ends. This is where the defying gravity thing comes in! Trust me, it'll work and it'll look awesome!
Let these strings dry completely before you go on. If you want to be on the safe side, dry them overnight. If you are pressed for time, an hour should do the trick.
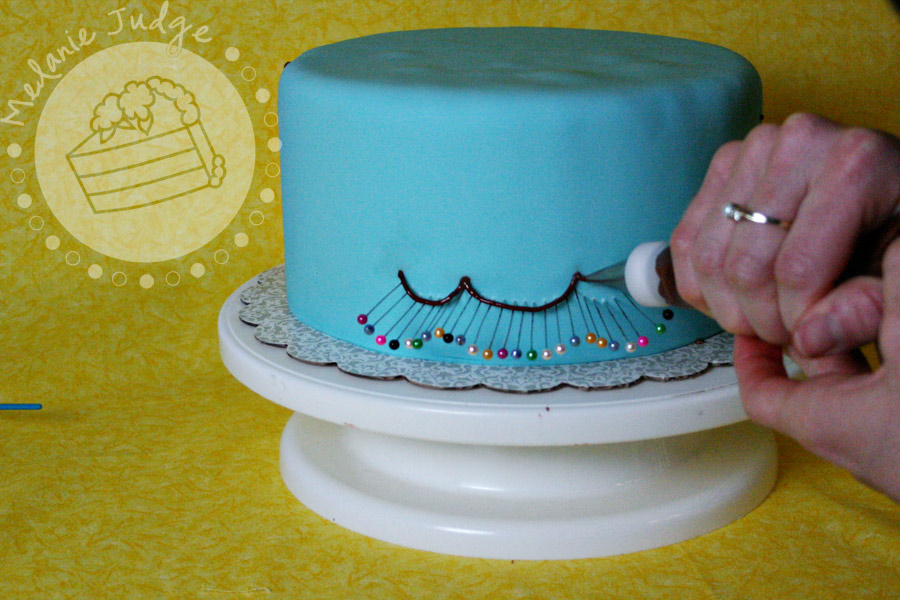
Step 3: Begin the Strings
Just like you did in Stringwork with a Bridge, start piping strings (using tip 0, 1, or 2) from the cake to the drop strings.
Briefly, touch your piping tip to the side of the cake and begin piping.

Keeping consistent pressure, continue piping while you slowly move the tip away from the side of the cake.

Hang out here while you let the string dry a little. If your string is long, hang out here longer. If it's nice and short you might not even need to wait.

Then slowly lower your tip to the drop string. Notice that the pins are still in place under the drop string. These will provide extra support while you're working. Still, you'll need to be gentle because the drop strings can break! And if they do, you get to start back at square one (or Step 2 in our case).


Step 4: Fixing Mistakes
Let's pretend that your string is crooked, imperfect, or just plain ugly. Want to remove it? No problem!
If the string is still wet, you can swipe it off with a dry paintbrush.


If it's dry, I like to use tweezers to carefully extract the bad string.
Step 5: Finish the Strings
Now you need to settle in for the long haul. Pipe all your strings! Try to keep them perfectly vertical and so close together that you can't fit another string in between.

Step 6: Remove the Support Pins
Let your strings dry completely. Then CAREFULLY remove the pins.
I've found that the safest way to remove them is to pull the head of the pin downward as I pull it out of the cake. This way, it doesn't drag against the drop string and break it.

Pins removed; view from the front:

Pins removed; view from above:

Pins removed; view from the side:

See? I told you they'd defy gravity! Don't they look cool?!
As usual, you can embellish your strings with Swiss dots, diagonal strings, etc. For an example, you can look at the bridgeless stringwork I did on this competition piece.
I know what you're thinking: "Sure, it looks great, but what about all those little pin holes in the cake?" Well, can you see them on mine? Aha! The pin holes are so small and they're BEHIND your strings so no one will ever see them. It's like magic.


3 comments:
this is amazing , thanks for sharing!!!
Thanks, Melanie! Great tutorial. :)
thanks for sharing with all the stepbystep photos! i enjoyed reading all your 3 posts on this..even though i doubt i have the guts to try it..lol!
Post a Comment