Showing posts with label tutorial. Show all posts

Tuesday, February 1, 2011

Fondant 101

It's time for a new tutorial! Today, instead of showing you how to do a specific project, we're going to talk about fondant.

What the heck is fondant, anyway?

Well, I like to think of it as edible play dough. Pretty much anything you can do with play dough, you can do with fondant!

You can purchase pre-made, ready-to-use fondant from a variety of sources:
Wilton
Satin Ice
Fondarific
FondX
Choco-Pan (actually an alternative to rolled fondant and made with white chocolate)

Or make your own from scratch:
Rolled Fondant Recipe
Rolled Marshmallow Fondant Recipe

The first think you need to know is fondant dries out quickly so you need to store it wrapped tightly in plastic wrap. I like to wrap mine in plastic wrap and then put it in a zip-top bag for extra protection against air exposure.

what is fondant tutorial
Working with fondant is very hands-on so you MUST wash your hands before you begin! Also, be careful what you wear. Any lint or hair particle on your shirt will show up in your fondant as you work. For this reason, knit tops and dark colors are usually avoided. Or just wear an apron!

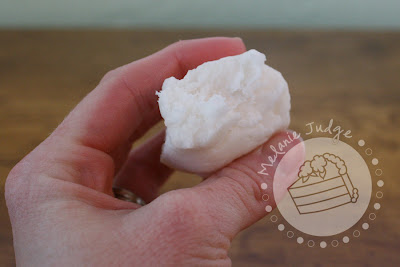
When you first open your fondant, it won't have much elasticity. If you pull the fondant in opposite directions, it will just break as shown in the pictures below.

what is fondant tutorial
So you have to knead it for a while until it become stretchy and elastic.

what is fondant tutorial
Now, you're ready to work with it!

You can do so many things with fondant, including but not limited to:
Cover Cakes with Fondant
Decorate Cookies
Add Fondant Accents/Cut-Outs to Buttercream or Fondant Cakes
Make Fondant Bows
Make Fondant Pleats

For many of these applications, you'll need to roll the fondant out to a thin sheet. If you're just beginning, you may want to use Wilton's rolling pins with guide rings. On the rolling pin pictured below, the purple rings allow you to roll your fondant to 1/8 of an inch thick and the pink rings let you go all the way to 1/16 of an inch thick. Using these guide rings helps you get an even thickness throughout your fondant sheet and ensures that you get the thickness you're aiming for.

what is fondant tutorial
Before I begin rolling the fondant, I always "smoosh" it with my hand. Just flatten it a little so it's easier to roll.

what is fondant tutorial
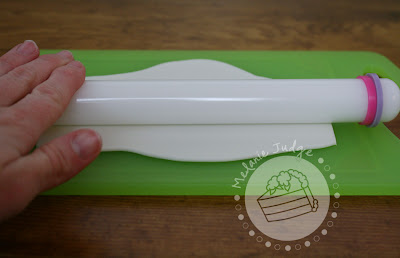
Then start rolling! Roll from the center of the fondant outward. When you reach the end, go back to the center and roll the other way. Keep rolling until the fondant is so thin that the rolling pin is just gliding over the surface of the fondant. That means your guide rings have worked and you've rolled to the right thickness!
what is fondant tutorial
And now you have a sheet of freshly rolled fondant to use for whatever your little heart desires!

what is fondant tutorial

Monday, November 22, 2010

Wedding Dress Cookies & Tutorial

It's been a while since I've posted a tutorial for you guys! But I think you'll enjoy this one. These cookie are pretty easy to make if you have the right tools.


Here's what you need:
Wedding Dress Cookie Cutter Texture Set from Country Kitchen Sweet Art
Sugar cookies (cut with the Wedding Dress cutter, baked & cooled)
Fondant colors of your choice
a paint brush
water
an angled spatula or knife
a rolling pin


Step 1: Roll the fondant out to 1/8-inch thickness. If you use the Wilton 9-inch rolling pin, the purple guide rings are 1/8-inch so just roll the fondant out until you can't get it any thinner.


Step 2: Choose one of the texture mats included with your cookie cutter set. Lay it on the fondant and press firmly. Be careful that the texture mat does not slip/move on the fondant. Then remove the texture mat and set aside.


Step 3: Use the Wedding Dress cookie cutter to cut out the imprinted fondant.


Step 4: Slather a thin layer of buttercream on the sugar cookie, and lay the fondant cut-out on top.


Step 5: Decorate the dress! For this tutorial, I'm going to make 3 mini ribbon roses to sit on one side of the dress at hip level.

Roll a piece of fondant paper-thin.


Step 6: Cut the fondant into 3 strips approximately a 1/2 inch wide. Then fold the strips in half lengthwise.


Step 7: Starting at one end, roll up the folded fondant strip. I like my ribbon roses to have little pleats in them so you can do that too, if you like.


Step 8: Now, you probably have a bunch of ugly fondant on the back of your ribbon rose so just trim that off with your spatula/knife.


Step 9: Apply a tiny bit of water to the wedding dress, and place the ribbon rose on top.


Repeat Steps 6-9 for the remaining 2 ribbon roses.


You can make so many different dresses with this cutter and texture set from Country Kitchen Sweet Art. For example, here are a few bridesmaid dresses.*


*Please ignore the damaged bow on the dress on the right. I took these cookies to Daytona for an ICES Day of Sharing and, of course, dropped them. Whoops!