Showing posts with label cookies. Show all posts

Wednesday, August 24, 2011

Chic Designer Print Cookies

I've been experimenting with combining edible prints with cookies lately. Here's a sneak peak at some of my successful attempts. Warning: These cookies are a bit racy, and may give a new meaning to Wednesday (today) being "hump day." *wink*

chic designer print bustier leopard pink polka dot blue polka dot bustier cookies photofrost
For these bustier cookies, I used blue polka dot, leopard print, and pink polka dot edible prints from my PhotoFrost printing system. The rest of the decorations were done with royal icing.

chic designer print bustier leopard pink polka dot blue polka dot bustier cookies photofrost
Stay tuned for more edible print cookies coming soon!

Monday, August 1, 2011

Garbage Truck Cake & Cookies

Last week, I had the privilege of making a cake and cookie favors for a very cute little boy's birthday.

Apparently, West is really into garbage trucks! He gets excited when they come to pick up his family's trash or recycling. In fact, the week of his birthday, they even let him help dump the recycling in the truck! How cool is that?!

So when his Mom contacted me to order his birthday cake, they (of course) wanted a garbage truck. We designed the cake based on photos of cakes she liked as well as photos of their local garbage truck. There were a few specific requests though. West wanted to make sure the cake had a front-end lift for garbage pick-up, not the traditional back loader, since that's what their local truck has. And he also preferred 3 wheels rather than 2. In addition, they wanted a yellow caution light on the top of the cake near the back, a number 4 somewhere on it, and "Happy 4th Birthday West!"


garbage truck birthday cake cookies
And you see that awesome logo "West Waste"? West's father made that logo, resembling their local trash pick-up company, to coordinate with West's Halloween costume last year. So the logo was a MUST on the cake!

garbage truck birthday cake cookies
The wheels were made of Rice Krispies Treats covered in fondant, but everything else you see is CAKE! The cake was covered with green or white buttercream and the decorations were done with fondant. And the cake flavor? Vanilla cake with Bavarian cream filling - yum!

West's Mom also ordered some garbage truck cookie favors for each of the party attendees. They were mini versions of the cake and were personalized with each person's name.

garbage truck birthday cake cookiesgarbage truck birthday cake cookies
Look, it's like a momma truck and a baby truck!

garbage truck birthday cake cookies
Happy Birthday, West!

Wednesday, February 2, 2011

We're Having a Baby!

Well the news is out! We've called all our friends & family and even announced it on Facebook. Announcing it on Facebook was a little intimidating for me...once you say anything, EVERYONE knows! That's a little scary!

So, it's only fair to announce it here too...I'm pregnant! My husband and I have been trying to conceive for 15 months so the fact that there is a baby (currently the size of a blueberry, according to what I've read) growing inside me is a bit surreal. And since we'd been trying so long, we had to come up with a creative way to break the news to our immediate families!

I made cookies in the shape of onesies using this cutter & texture mat set from Country Kitchen Sweet Art. On each cookie, I hand-painted a special message for each family member.

These are the cookies for my Dad, Mom, and sister:

baby announcement cookies onesies
And these are the ones we gave to my in-laws:

baby announcement cookies onesies
And, of course, I made a little surprise for the Daddy-t0-be:

baby announcement cookies onesies
The doctor said I'm actually due Sept 22nd, but I was close! How did you break the news to your family and friends? I'd love to hear about it!

Monday, January 10, 2011

BCS National Championship 2011

Tonight will wrap up this year's college bowl season. I LIVE for college bowl games so I'm sad to see it ending again...but I can't wait to watch tonight's game! It's the BCS National Championship Game - Auburn versus Oregon!

Two of my good friends, Ben & Shelby, moved to Oregon last year and are HUGE University of Oregon fans. Shelby wanted to surprise Ben with some Oregon cookies for the big game...so this is what I sent them:

2011 bcs national championship cookies oregon auburn football
Go Ducks!

Tuesday, January 4, 2011

Boy Bear Baby Shower Cake

Have you all seen enough of Christmas/winter stuff yet? Well, I'll give you a short break today, but I've got more winter cakes to post later so deal with it! *wink*

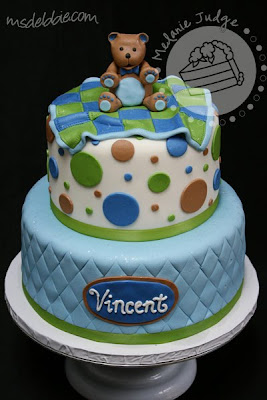
Here's a cute cake we did for a shower for a baby boy:

boy baby shower bear blanket cake
They wanted the bottom tier to be quilted, and the top tier to have polka dots that matched the party colors - lime green, dark blue, and brown. Then, they wanted a cute teddy bear sitting on top. We decided to add the baby blanket to give the cake an extra pop of color!

boy baby shower bear blanket cake
Awe, what a sweet little bear...He looks like he's perfect for hugging, don't you think?

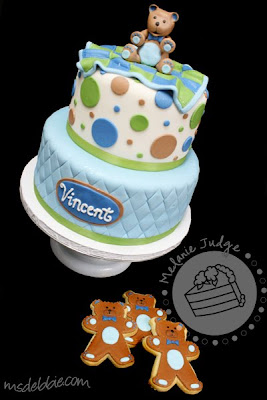
boy baby shower bear blanket cake cookies
And then we decorated cookie party favors to match the cake! Here are a couple of close-ups of the cookies:

bear cookies baby shower boy
So cute. I'm definitely a fan of the blues, green, and brown color combination!

Monday, January 3, 2011

Hershey's Baking Pack Giveaway!

Let's start off the new year right...with a Hershey's giveaway!

If you recall, in December I was given the opportunity to interview Linda Stahl, the baking authority, at Hershey's Test Kitchens. To accompany the interview, they sent me an awesome gift package to give away to one of you!

Here's what's included:

Reese's Peanut Butter Chips

Hershey's Milk Chocolate Kisses


Heath Bits 'O Brickle Toffee Bits

Hershey's Natural Unsweetened Cocoa Powder


Hershey's Milk Chocolate Chips

And an adorable chocolate-colored Hershey's apron!

Click on over to my previous post about cookie exchanges for tips/hints and the Linda Stahl interview. But be sure to leave a comment here to enter for a chance to win the Hershey's gift pack!

Official Rules: For a chance to win, leave a comment telling me what your favorite cookie to munch on this holiday season was. Note: This part is mandatory and must be completed before extra entries can be awarded.

Extra entries:
1 entry - Be a Cake Walk follower on Google Friend Connect (in the left sidebar).
1 entry - Subscribe to Cake Walk's RSS feed.
1 entry - Like Mel's Cake Walk on Facebook.
1 entry - Add the Cake Walk button to your blog.
1 entry - Follow @MelsCakeWalk on Twitter.
1 entry - Retweet the giveaway. (You can do this 2 times/day; leave a comment here each time.)
3 entries - Make a post about this giveaway on your own blog. (leave 3 comments here to get credit.)

Leave one comment per entry please. If you already do any of the above, please say so in a comment to get credit for the extra entry. This contest is open to adult US residents only. The giveaway will end Friday, January 14, 2011 at midnight eastern time. Good luck!

Friday, December 24, 2010

Dat 12 - Santa is Coming to Town!

The sleigh is ready, the gifts are all packed, and Santa is coming to town!

santa christmas heart star sugar cookie
For the Santa cookies, I decided to go back to the classics we probably all decorated when we were a kid.
Are you ready for Santa? Do you leave cookies & milk for him?

Thursday, December 23, 2010

Day 11 - Reindeer Cookies!

It's the day before Christmas Eve so Santa is preparing his sleigh for the big trip. The reindeer are resting up, and they're anxious for the fun to begin!

reindeer christmas sugar cookiesreindeer christmas sugar cookies

Tuesday, December 21, 2010

Day 9 - Mittens and Stockings

It's Day 9 of the 12 Days of Cookies! I hope you're all staying warm - wherever you are in blogger land!

christmas holiday mitten cookies royal icingchristmas stocking cookies royal icing

Both the mittens and stockings were flooded with thinned down royal icing and then the extra little details were added after they dried.

Have you been making holiday cookies? I'd love to hear about them and see them! Email them to me or leave a comment with your own blog post link!

Saturday, December 18, 2010

Zebra & Leopard Print Cookies!

Last Wendesday, my baby sister turned 24! Twenty four! She's really starting to catch up on me.... *wink*

For her birthday, I made her zebra and leopard print cookies.

zebra leopard print sugar cookies royal icing
The animal print patterns were made with royal icing. The hot pink "R" was made of fondant, and the glitter around the border was just black Wilton Cake Sparkles!

zebra leopard print sugar cookies royal icing
Happy Birthday, Robin! I hope you like the cookies!

Friday, December 17, 2010

Day 5 - Christmas Lights

For Day 5, here are some Christmas lights sugar cookies. These are much more simple in design than yesterday's ornaments, but I love them all the same.

sugar cookie christmas light royal icing
I've been getting quite a few emails asking for my recipe so I'll share that with you in an upcoming post! Happy Friday, everyone!

Thursday, December 16, 2010

Day 4 - Ornament Cookies

These are some of my favorite cookies that I've included in the 12 Days of Cookies. They're simple Christmas ornaments, but each one is different...and so easy to do!

christmas ornament cookies royal icing
christmas ornament cookies royal icingFor the blue one on the left: Flood the ornament with blue royal icing. Let that dry overnight, and then go back with white and 2 shades of blue royal icing and add the dots, curves, and lines.

For the Peace ornament: Flood a rectangle in the center with green royal icing. Then flood the top and bottom sections with white royal icing. To make the red polka dots, just add them to the white flooded icing while it's still wet! Once the green dries, go back and write "peace." Easy!

For the Joy ornament: Use the same technique as the Peace ornament, but drag a toothpick through the flooded icing to get that cool pattern. Then write "joy" after the red icing has dried.

christmas ornament cookies royal icing
For the blue ornament on the left: Again, flood the ornament with blue royal icing. After it dries overnight, go back with white royal icing and add all the details.

For the ornament on the far right: Flood the center portion red. Then, go back and flood sections white and green. Once all the flooded area has dried, just go back and add the details.

Need a more detailed tutorial, check out this one on Bake at 350.

Wednesday, November 24, 2010

Fall Cookie Bouquet

Last Sunday, I taught a Fall Cookie Bouquet class at Ms Debbie's Sugar Art. There were only 5 students, and I think that was perfect! There was plenty of room to move around, lots of individual instruction, and enough time to socialize. Best of all, the students completed a cookie bouquet just in time for Thanksgiving! Yummy!

This is the finished bouquet:


There were 3 fall leaves, 1 pumpkin (with orange sparkles!), 1 turkey, and 1 acorn.

Notice that little blemish on the left side of the turkey? Well, as the instructor, I had to sacrifice the perfection of my piece to demonstrate what would happen if you touch the flooded icing as it dries. Yea, that's the ticket...


I think the turkey and the acorn are my favorites. So cute!


Check out more photos on Ms Debbie's Sugar Art Facebook Fan Page. And, if you're interested, we'll be doing a winter cookie bouquet as well as a gingerbread house class in December! Check Debbie's website for more info on those classes.

Happy Thanksgiving!

Monday, November 22, 2010

Wedding Dress Cookies & Tutorial

It's been a while since I've posted a tutorial for you guys! But I think you'll enjoy this one. These cookie are pretty easy to make if you have the right tools.


Here's what you need:
Wedding Dress Cookie Cutter Texture Set from Country Kitchen Sweet Art
Sugar cookies (cut with the Wedding Dress cutter, baked & cooled)
Fondant colors of your choice
a paint brush
water
an angled spatula or knife
a rolling pin


Step 1: Roll the fondant out to 1/8-inch thickness. If you use the Wilton 9-inch rolling pin, the purple guide rings are 1/8-inch so just roll the fondant out until you can't get it any thinner.


Step 2: Choose one of the texture mats included with your cookie cutter set. Lay it on the fondant and press firmly. Be careful that the texture mat does not slip/move on the fondant. Then remove the texture mat and set aside.


Step 3: Use the Wedding Dress cookie cutter to cut out the imprinted fondant.


Step 4: Slather a thin layer of buttercream on the sugar cookie, and lay the fondant cut-out on top.


Step 5: Decorate the dress! For this tutorial, I'm going to make 3 mini ribbon roses to sit on one side of the dress at hip level.

Roll a piece of fondant paper-thin.


Step 6: Cut the fondant into 3 strips approximately a 1/2 inch wide. Then fold the strips in half lengthwise.


Step 7: Starting at one end, roll up the folded fondant strip. I like my ribbon roses to have little pleats in them so you can do that too, if you like.


Step 8: Now, you probably have a bunch of ugly fondant on the back of your ribbon rose so just trim that off with your spatula/knife.


Step 9: Apply a tiny bit of water to the wedding dress, and place the ribbon rose on top.


Repeat Steps 6-9 for the remaining 2 ribbon roses.


You can make so many different dresses with this cutter and texture set from Country Kitchen Sweet Art. For example, here are a few bridesmaid dresses.*


*Please ignore the damaged bow on the dress on the right. I took these cookies to Daytona for an ICES Day of Sharing and, of course, dropped them. Whoops!