Thursday, January 13, 2011

Fondant Cupcake Cookie Tutorial

I decided to try a new technique on a cookie yesterday. So many people decorate sugar cookies with royal icing or glaze...But can you make them super cute with fondant?!

fondant cupcake cookie whimsical girly pink blue green tutorial
I'm thrilled with how these came out. And - best of all - you don't need any special tools! My tools were all at the bakery so I had to do with what I had lying around the house. So, because I love all of you, here is a tutorial so you too can make adorable fondant-decorated cupcake cookies. Enjoy!

Here's what you'll need:
-fondant in your choice of colors
-the cookies, of course!
-the cookie cutter you used (I used this one from Crate & Barrell...a gift from Nicole!)
-a rolling pin
-a sharp knife
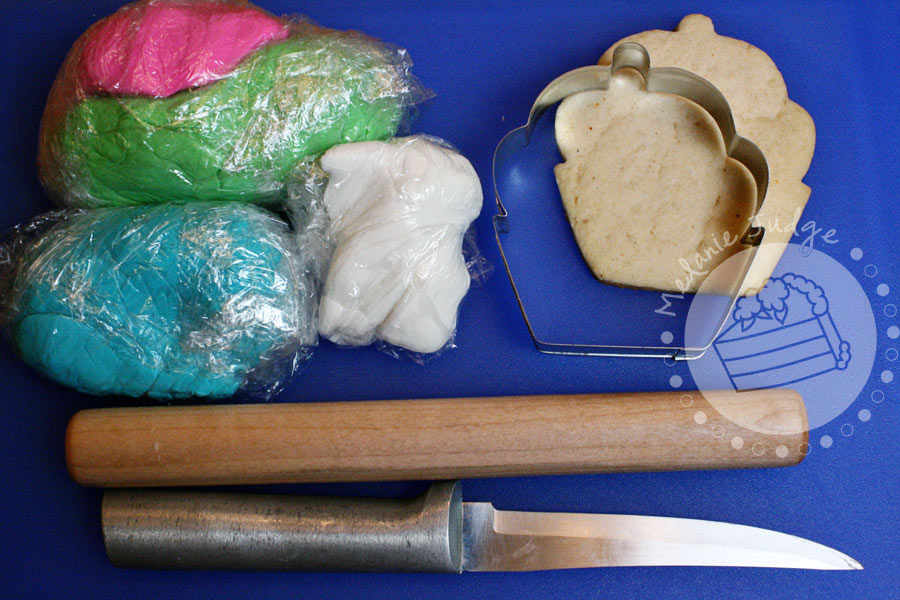
fondant cupcake cookie whimsical girly pink blue green tutorial
Step 1: Roll out your first choice of fondant color. I don't measure the thickness of my fondant when I work, but you probably want to shoot for about an 1/8 of an inch thick.

Then use the cookie cutter to cut the cupcake wrapper part out of the fondant.

fondant cupcake cookie whimsical girly pink blue green tutorial
Step 2: Use your knife to cut the top of the cupcake wrapper in a wave motion. Discard the excess fondant.
fondant cupcake cookie whimsical girly pink blue green tutorial
Step 3: Spread a thin layer of buttercream icing on your cookie and set the cupcake wrapper part on it!

fondant cupcake cookie whimsical girly pink blue green tutorial
Step 4: Roll out white fondant to 1/8 inch thick, and use the cutter to cut out the icing part of the cupcake.

fondant cupcake cookie whimsical girly pink blue green tutorial
Step 5: Trim the cherry off the top and trim the bottom with a straight cut - all the way across. Then, stick it on your cookie!

fondant cupcake cookie whimsical girly pink blue green tutorial
Step 6: Use your finger to push the white fondant down into the waves of the pink cupcake wrapper. Work relatively quickly to get the fondant where you like it. If you work too slow, your fondant will crack, tear, wrinkle, or have any number of undesirable consequences.

fondant cupcake cookie whimsical girly pink blue green tutorial
Step 7: Use the BACK of your knife to put creases in the cupcake liner. To do this, I just pushed the knife down into the fondant. If you have a straight edge on the back of your knife, there's no need to actually move the knife up or down (which could tear the fondant)...just push down into the fondant and lift!

fondant cupcake cookie whimsical girly pink blue green tutorial
Step 8: Choose another color of fondant and roll a super thin rope out of it. The thickness of your rope will determine the size of your sprinkles so keep it thick if you want big, whimsical sprinkles. Then, using your knife, cut the rope into pieces that range between 1/8 to 1/4 of an inch long. Again, you can adjust this to how you want your sprinkles to look.

fondant cupcake cookie whimsical girly pink blue green tutorial
Step 9: Lay your sprinkles on the top of the cupcake in a random fashion. These are just sitting on the cupcake at this point - they are in no way adhered to the fondant so don't make any sudden movements or bump the table.

fondant cupcake cookie whimsical girly pink blue green tutorial
Step 10: Using your rolling pin, gently roll over the sprinkles to "smoosh" them into the white fondant. This should adhere them to the surface! If not, apply a small amount of water under the sprinkles and that should do the trick.

fondant cupcake cookie whimsical girly pink blue green tutorial
Step 11: Choose a third color of fondant and roll it into a tiny ball. Using a little dab of buttercream, attach the ball to the top of the cupcake.

fondant cupcake cookie whimsical girly pink blue green tutorial
Step 12: Then "smoosh" the ball with your finger!

fondant cupcake cookie whimsical girly pink blue green tutorial
Done and done! Great job! If you make any cookies using the techniques or cookie cutter I used, send them to me! You may be the Friday Feature on Mel's Cake Walk Facebook Fan Page! Ooooh, aaaaah. *grin*

Wednesday, January 12, 2011

Mango Calla Lily Wedding Cake

Here's another wedding cake from back in October 2010. This one was done for some friends who were in the same doctoral program as me at the University of Florida. I'll post the groom's cake tomorrow - it's very "scientific."

mango calla lily buttercream embroidery wedding cake
Megan and Jeremiah got married at the Sweetwater Branch Inn, where they set up the wedding cakes in front of a gorgeous mirror in the foyer area.

The cake was iced in buttercream, and here is a close-up of the gum paste Mango Calla Lilies cascading down the cake and the hand-piped details that matched the embroidery on Megan's dress.

mango calla lily buttercream embroidery wedding cake
Their wedding photographer was another friend of mine: Elise Kersey. Here are the shots she got:

mango calla lily buttercream embroidery wedding cakemango calla lily buttercream embroidery wedding cake
mango calla lily buttercream embroidery wedding cake

Tuesday, January 11, 2011

Seven-Tier Wedding Cake in St. Augustine, FL!

This wedding cake is from back in October...why haven't I posted it before now? Your guess is as good as mine! But I think you'll all really like it.

It was a seven tier wedding cake - all decorated with white and ivory fondant.

st augustine fondant white ivory lace swags quilting drapes wedding cake
The cake topper was a dome of white and ivory gum paste flowers, and the top two tiers were decorated with fondant swags, lace, and quilting.

st augustine fondant white ivory lace swags quilting drapes wedding cake
Then we had some ivory fondant stripes, more lace, more quilting, and a lot of fondant pleats around the base!

st augustine fondant white ivory lace swags quilting drapes wedding cake
While I was in the middle of setting up the cake, the bridesmaids announced that Caroline was dying to see her cake! So, I moved all my stuff aside and...here comes the bride!

st augustine fondant white ivory lace swags quilting drapes wedding cakest augustine fondant white ivory lace swags quilting drapes wedding cake
I think she liked it.

st augustine fondant white ivory lace swags quilting drapes wedding cake
And I think she was even more excited to cut into it!

st augustine fondant white ivory lace swags quilting drapes wedding cake
After tasting the cake, Caroline gave the camera a thumbs-up...yummy! But, wait a minute, Rob has icing on his finger...and a rather sinister look on his face. Don't do it, Rob! Do NOT rub that icing on Caroline's gorgeous nose!

*Thank you to Dana Goodson Photography for providing such amazing photos of the cake and cake cutting! See more of her shots of the wedding here.

Monday, January 10, 2011

BCS National Championship 2011

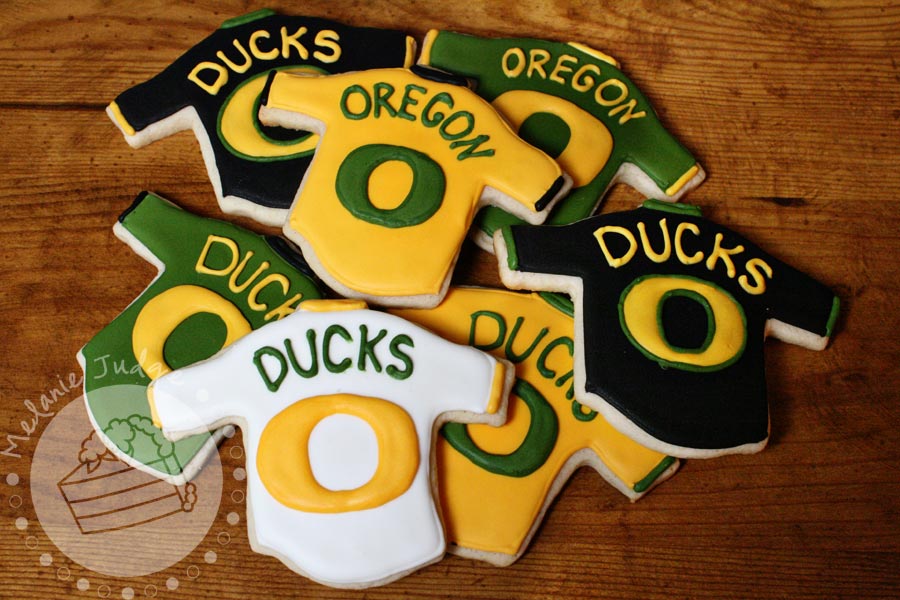
Tonight will wrap up this year's college bowl season. I LIVE for college bowl games so I'm sad to see it ending again...but I can't wait to watch tonight's game! It's the BCS National Championship Game - Auburn versus Oregon!

Two of my good friends, Ben & Shelby, moved to Oregon last year and are HUGE University of Oregon fans. Shelby wanted to surprise Ben with some Oregon cookies for the big game...so this is what I sent them:

2011 bcs national championship cookies oregon auburn football
Go Ducks!

Thursday, January 6, 2011

Black & White Damask Wedding

This has to be one of my favorite cakes that we did recently. The bride wanted the cake to be black & white Damask. Now, normally, we just do black Damask royal icing on a white fondant-covered cake, but for this one we alternated the tiers with black and white fondant. Then, we used the opposite color for the royal icing Damask pattern.

Oh, and this was my FIRST time attempting the Damask technique!

black white fondant wedding cake
Isn't it purdy???

I thought so. And when we arrived to deliver the cake, I thought it matched the rest of the wedding PERFECTLY!


black white fondant wedding cake
black white teal wedding adore eventsblack white teal wedding adore events
I love this black & white candy favor bar:

black white teal wedding adore eventsblack white teal wedding adore events
And while I was zipping around taking photos, I noticed the hubs was slowly, silently wandering the room. What was he doing? Checking out the air conditioning. That's what an HVAC mechanical engineer does...checks out the venting and duct work in EVERY building we go to. Joy!


The room decorations and event planning were done by Adore Events. Check out their page for some before & after shots and more photos from the wedding.

Wednesday, January 5, 2011

Pistachio and Pink Wedding Cake - And a New Technique

A few weeks ago, a bride brought us a picture of a gorgeous wedding cake that she wanted replicated. No problem! ...except that we'd never done a cake like the one pictured. So we experimented with different techniques and were able to replicate it! Yay!

Now, maybe I'm just not "up" with current wedding cake trends, but I've never seen a cake like this before:

white fondant wedding cake green swirls with green and pink roses
Don't you just love it?

white fondant wedding cake green swirls with green and pink roses
The technique was created by slightly marbelizing the green and white fondant, cutting it into strips, and applying it in an overlapping pattern to the cake. It was time consuming, but I love how it turned out.

And all the roses were hand-made to match the color swatches the bride provided.

while I was editing the pictures, I thought I'd have a little fun with Photoshop and give the cake a more soft, romantic, vintage feel...

white fondant wedding cake green swirls with green and pink roses
Loving the subtle tones of that shot!

Tuesday, January 4, 2011

Boy Bear Baby Shower Cake

Have you all seen enough of Christmas/winter stuff yet? Well, I'll give you a short break today, but I've got more winter cakes to post later so deal with it! *wink*

Here's a cute cake we did for a shower for a baby boy:

boy baby shower bear blanket cake
They wanted the bottom tier to be quilted, and the top tier to have polka dots that matched the party colors - lime green, dark blue, and brown. Then, they wanted a cute teddy bear sitting on top. We decided to add the baby blanket to give the cake an extra pop of color!

boy baby shower bear blanket cake
Awe, what a sweet little bear...He looks like he's perfect for hugging, don't you think?

boy baby shower bear blanket cake cookies
And then we decorated cookie party favors to match the cake! Here are a couple of close-ups of the cookies:

bear cookies baby shower boy
So cute. I'm definitely a fan of the blues, green, and brown color combination!

Monday, January 3, 2011

Hershey's Baking Pack Giveaway!

Let's start off the new year right...with a Hershey's giveaway!

If you recall, in December I was given the opportunity to interview Linda Stahl, the baking authority, at Hershey's Test Kitchens. To accompany the interview, they sent me an awesome gift package to give away to one of you!

Here's what's included:

Reese's Peanut Butter Chips

Hershey's Milk Chocolate Kisses


Heath Bits 'O Brickle Toffee Bits

Hershey's Natural Unsweetened Cocoa Powder


Hershey's Milk Chocolate Chips

And an adorable chocolate-colored Hershey's apron!

Click on over to my previous post about cookie exchanges for tips/hints and the Linda Stahl interview. But be sure to leave a comment here to enter for a chance to win the Hershey's gift pack!

Official Rules: For a chance to win, leave a comment telling me what your favorite cookie to munch on this holiday season was. Note: This part is mandatory and must be completed before extra entries can be awarded.

Extra entries:
1 entry - Be a Cake Walk follower on Google Friend Connect (in the left sidebar).
1 entry - Subscribe to Cake Walk's RSS feed.
1 entry - Like Mel's Cake Walk on Facebook.
1 entry - Add the Cake Walk button to your blog.
1 entry - Follow @MelsCakeWalk on Twitter.
1 entry - Retweet the giveaway. (You can do this 2 times/day; leave a comment here each time.)
3 entries - Make a post about this giveaway on your own blog. (leave 3 comments here to get credit.)

Leave one comment per entry please. If you already do any of the above, please say so in a comment to get credit for the extra entry. This contest is open to adult US residents only. The giveaway will end Friday, January 14, 2011 at midnight eastern time. Good luck!