*Disclaimer: There are MANY different methods to rolling out cookie dough. This method may or may not work for you. It's what works for me. Period.
Step 1: Make Sugar Cookie Dough
I use this recipe from Cooking Light Magazine. I always mix up the dough at least 1 day in advance and store it in the refrigerator so it's nice and chilled when I'm ready to bake.
Step 2: Roll Out Dough
Here are the tools you'll need:
-1 rolling pin (silicone-coated works best)
-nonstick baking spray
-cookie cutters of choice
-SilPat
-1 batch of sugar cookie dough

Spray SilPat with baking spray and place dough on top. I give my dough a good smoosh with my hand so it's a little easier to roll (remember, it's chilled so it's very hard). Then spray the top of the dough with baking spray.

Roll out the dough. If it's sticking to your rolling pin, spray the top of the dough again with baking spray. You don't need a perfect rectangle/circle when you roll. In fact, I usually use only 1/4 of the sugar cookie dough (the rest is stored in the fridge) and work on only one side of the SilPat.

Do you have trouble keeping your dough an even consistency throughout? Try using Wilton's 20-inch rolling pin with guide rings to get an even thickness. Or, place one wooden dowel on either side of your cookie dough and roll on top of that. Both the guide rings and the wooden dowels will only let you go to a certain thickness so you won't get super thin spots in your rolled dough.
Step 3: Cut out Cookies
Using your chosen cookie cutter, cut out your cookies from the rolled dough. Don't cut them too close together, though, because they will spread a little bit while baking.

Step 4: Tear Away Excess Dough
Peel up the excess dough around the cookie cut-outs. Simple as that! It should come up really easily since you sprayed the SilPat with baking spray. If it gives you trouble in spots, slide a thin spatula underneath it. Of course, be careful not to nudge your perfectly shaped cookie cut-outs.

Step 5: Repeat Until SilPat is Full
Now, I have to mention here that some people like to freeze the shapes at this point. Then, you could pick them up and move them around the SilPat. This would allow you to fit more shapes on 1 pan and reduce your total amount of baking time.
I'd rather just bake what I can fit on a pan, and continue rolling on another SilPat. When I bake cookies, I have 4 SilPats going at a time so I've always got one ready to go in the oven.

Step 6: Bake!
Baking time will depend on your oven and the size of your cookie. If I'm unsure how long the cookie size will take to bake, I usually set the timer for 7 minutes and check it then. Your cookie should not be shiny at all when it's finished baking.
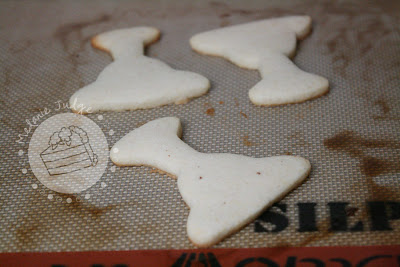
That being said, it'll take some practice to know when to remove the cookies from the oven. Ideally, you want to remove them JUST BEFORE the edges start to turn brown. In the image below, two of the cookies are perfect, but the one in the left rear started to get a little brown. A little brown like that is ok because your decorations will probably mask it. Yay!

Let the cookies sit for 1-2 minutes on the pan. This will allow them to harden a little. When they're hard enough to lift (they don't break when you lift them), move them to a cooling rack to cool completely.
Step 7: Repeat!
Just keep repeating the above steps until you've used all your dough. If the dough starts to get too warm, it'll get really sticky. When I'm done working with some dough, I throw it back in the fridge or freezer. The key is to keep it chilled!
Now you may have also noticed in the picture above that after you bake, the baking spray on the SilPat turns brown. Not very appetizing, right?! Well, it won't do much damage. If you roll your dough on top of that, the dough will start to turn brown a little, but it won't change the flavor. If you want to avoid the color change, just wipe the SilPat with a paper towel before you roll dough out on it again.

So, why was I baking cookies this week? Well, I can't reveal that yet...but I can tell you it was a surprise for one of the most amazing people in my life. Here's a sneak peak of the finished cookies:

And I have no problem showing you that sneak peak because these margarita cookies actually broke while I was packaging them! So this person won't even receive them...I already ate them! Stay tuned for the big reveal of the rest of the cookie batch and the recipient next week!


4 comments:
Love your finished cookies! As usual. :-) I put the dough in the fridge for a little between rolling it out (then fridge) then cutting the shapes.
Great blog post!
Great post! What kind of vanilla do you prefer to us? I can see the specks in the dough which I love!
Julie, I use a vanilla that comes straight from my extended family in Honduras. :)
so cute!!!!!!!!!!!
Post a Comment