Well, the 12 Days of Cookies are over, and Christmas is here! It's tradition in our family to watch A Christmas Story all...day...long... My dad's a HUGE fan. So, to make him smile, I decorated these leg lamp cookies:
'It's a major award!"
I got the cutter from A Christmas Story House and highly recommend them for any Ralphie-themed gifts you need to get in the future!
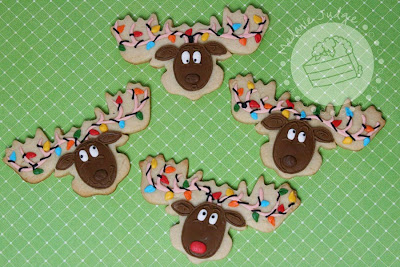
It's the day before Christmas Eve so Santa is preparing his sleigh for the big trip. The reindeer are resting up, and they're anxious for the fun to begin!
Ok, folks. Christmas is quickly approaching. If you've thought about bringing a festive cake to your family celebration, you better get baking soon!
But you don't have to spend hours and hours on a cake for it to look gorgeous, elegant, and Christmas-y!
Make a cake that looks like a gift!
Here's one I did for my friend Nikki's office holiday party:
It's a simple buttercream-iced cake with a fondant bow. You could slap that together in a couple of hours, right?!
Here's a close-up of the bow and the gift tag:
Next up, here's a display cake I made for the showroom. It's covered with fondant and airbrushed gold. Again, the bow is made out of fondant.
Here's a similar concept, where the cake was covered in white fondant and topped with a big loopy gift bow. Here, you have to have a little more time because each of those loops has to completely dry before you can assemble the bow.
And, if you're feeling particularly ambitious or you're trying to feed a small army, here's some inspiration for you:
That's 4 cakes covered in white fondant and decorated with blue fondant box tops, ribbons, and bows.
Will you be making a cake for your get-together this week?
Can you believe we're only 5 days away from Christmas! Not much time left for your many to-do lists! Am I stressing you out? Sorry! Ironically enough, I JUST ran across this website 100 Days to Christmas. It helps you plan and get ahead for the holidays so you don't feel so frantic. Might be worth checking out for next year...
For today's cookie, I searched in Google Images for "penguin snow." Here's a cute image I found:
To make the cookie, you have to flood the background first (the sky and snow on the ground). When that's dry, go back and pipe on the penguin and falling snow. He's just so cute, don't you think!?
One of my favorite holiday traditions is baking Christmas cookies, and I like to share them with others at a cookie exchange. While cookie exchanges are meant to be a time to relax with friends, exchange recipes, and eat yummy food, many people find them frustrating and stressful.
However, Hershey's has launched a new campaign to make cookie exchanges easy for everyone! I recently had the opportunity to interview Linda Stahl, who is the baking authority at Hershey's kitchen. She had some great tips and ideas for both the host and the attendee (see video below)!
I have been hosting cookie exchanges for the last 6 years so I've learned lots of things to make the whole thing more enjoyable for the host. Here are my top 5 tips for hosting a cookie exchange:
1. Plan your menu well in advance so you have plenty of time to grocery shop, pick up the festive plates & napkins, and figure out if you have enough platters on which to display the food. 2. Plan a menu that doesn't require much last-minute prep work. As guests arrive, you should be able to greet them, chat, and invite them to start eating. Don't get yourself stuck in the kitchen taking the hors d'oeuvres out of the oven and miss the party. I try to make things that can be served at room temperature so it can all be set up 30 minutes before guests arrive. 3. Bake your cookie for the exchange at least a day in advance. The cookies will stay fresh as long as you store them properly, and this will allow you plenty of time to prepare the rest of the food for the party. 4. Keep your guests informed! Let them know how many people are coming to the party so they have enough cookies and recipe copies. Also, let them know if you'll be serving a sit-down meal or just hors d'oeuvres so they can plan accordingly. 5. Relax and enjoy your guests! Abandon the kitchen during the party so you can chat with your guests and enjoy the holiday ambiance.
If you're attending a cookie exchange, don't make the assumption that the cookie you bring needs to be complicated or "impressive." Often, the most simple recipes are the tastiest ones! Unless you have plenty of time on your hands, don't try a cookie for the first time the day before or the day of the exchange. Stick to a family recipe or one you're familiar with! You'll arrive at the party in a much better mood, and you might even have a great family story to share about your cookie!
If you're hosting an exchange or have been to one this year, think about 1 tip you'd share with others. And stay tuned because I'll be posting a giveaway from Hershey's in the next few days! To enter, you'll leave your suggestion in the comments section of the giveaway post (not this one)....so start thinking now!
Last Wendesday, my baby sister turned 24! Twenty four! She's really starting to catch up on me.... *wink*
For her birthday, I made her zebra and leopard print cookies.
The animal print patterns were made with royal icing. The hot pink "R" was made of fondant, and the glitter around the border was just black Wilton Cake Sparkles!
Happy Birthday, Robin! I hope you like the cookies!
For Day 5, here are some Christmas lights sugar cookies. These are much more simple in design than yesterday's ornaments, but I love them all the same.
I've been getting quite a few emails asking for my recipe so I'll share that with you in an upcoming post! Happy Friday, everyone!
These are some of my favorite cookies that I've included in the 12 Days of Cookies. They're simple Christmas ornaments, but each one is different...and so easy to do!
For the blue one on the left: Flood the ornament with blue royal icing. Let that dry overnight, and then go back with white and 2 shades of blue royal icing and add the dots, curves, and lines.
For the Peace ornament: Flood a rectangle in the center with green royal icing. Then flood the top and bottom sections with white royal icing. To make the red polka dots, just add them to the white flooded icing while it's still wet! Once the green dries, go back and write "peace." Easy!
For the Joy ornament: Use the same technique as the Peace ornament, but drag a toothpick through the flooded icing to get that cool pattern. Then write "joy" after the red icing has dried.
For the blue ornament on the left: Again, flood the ornament with blue royal icing. After it dries overnight, go back with white royal icing and add all the details.
For the ornament on the far right: Flood the center portion red. Then, go back and flood sections white and green. Once all the flooded area has dried, just go back and add the details.
Need a more detailed tutorial, check out this one on Bake at 350.
This week, we got to make a fun cake for Bertie Heating & Air's holiday party. They wanted a cake in the shape of a house decorated for Christmas! But they also wanted it to resemble their company logo:
No problemo!
The cake itself was 2 stories high, meaning it was equivalent to 2 tiers of cake...or about 10-12 inches tall. The chimney was made of Rice Krispies Treats, and the bricks were individually cut and set in place.
I made the front porch awning out of Rice Krispies Treats and hand-cut the letters for Bertie logo.
Of course, we had to include an air conditioning unit!
And the Christmas lights. They were SO tiny! I had to take a picture with my pinky finger next to one so you could get an idea of how small they were. They were individually glued in place with royal icing!
But it was all so worth it when the customer picked up the cake. She said she'd dreamed of the cake the night before and had goosebumps when she saw it.
This kind of reaction is what we cake decorators live for!
With Day 2 of my 12 Days of Cookies, I thought I'd include some snowman cookies since it's been so darn cold outside lately! Last night, we hit lows in the teens...in FLORIDA! Yikes!
So I was thinking...what does a "Florida Snowman" look like? This was what came to mind:
But let's face it, THIS is what a real Florida Snowman looks like:
*This adorable cookie was created by Meaghan at The Decorated Cookie. She calls him Mr. Melty. Don't you love that?! She's awesome, and has a book out!
From now until Christmas, I'll be posting a different decorated sugar cookie for your viewing pleasure. I'll sprinkle a few cakes in too - because I can't resist. We've done some pretty cool cakes in the last few weeks, and I can't wait to show you!
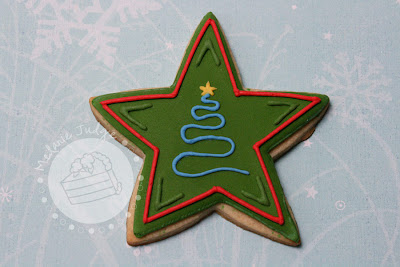
Day 1 - Christmas Trees 3 Ways.
How do you decorate your tree? With lights, ornaments, garland? Do you use ornaments that have memories and special meaning to your family or do you color coordinate everything?
Is your tree up already or are you one of those who waits until Christmas Eve?
Here's a very clean, elegant, gorgeous wedding cake. It was 3 hexagon tiers iced in buttercream, with each tier wrapped with a black satin ribbon.
The bride provided the shiny, ornate monograms and the broach to go in the center of the large gum paste bow I made. I love how the bow is offset on the top of the cake, and the tails just drape down over the other tiers!
But, wait! What's this peeking from around the back of the cake???
Oh my! It's a gecko!
Yup, they wanted a sugar gecko climbing up the back of the cake! The bride has a pet gecko, and apparently it represents the couple's quirkiness. Just like no two couples are the same, neither are their cakes!
Or their geckos, for that matter. This is actually the second gecko I made. I based the creation of the first one off a quick Google search for "gecko." The bride & groom were in the bakery the week of the wedding so we excitedly showed them the gecko. It didn't pass inspection. You see, she doesn't have an ordinary gecko. She has one with a stumpy little tail like you see in the photo. The tail actually mimics the head so if the gecko is attacked by a predator, it can fool him and escape!
Hello & welcome to my blog! I'll predominantly talk about my experiences with sugar artistry, but I'll probably also talk about everything else I love - family, Nani, soccer, etc. I hope you enjoy perusing the cake pictures as much as I have enjoyed creating them!
In December 2009, I graduated from the University of Florida with a Ph.D. in biomedical research. My lab specifically studied obesity which is a bit ironic since all I can think about is baking! I am now working full-time in a bakery where I play with sugar all day. Can life get any better?!


 For the blue one on the left: Flood the ornament with blue royal icing. Let that dry overnight, and then go back with white and 2 shades of blue royal icing and add the dots, curves, and lines.


 *This adorable cookie was created by Meaghan at The Decorated Cookie. She calls him Mr. Melty. Don't you love that?! She's awesome, and has a book out!


