Friday, January 28, 2011

AutoFrost Demo Machine

How many of us hate writing on a cake?

The cake looks perfect...and then you have to write Happy Birthday or Happy Anniversary, praying that you don't misspell it or write on a slant.

Well, as part of their class project, engineering students at Franklin W. Olin College of Engineering have created a robot to write on cakes FOR YOU!

Here's a picture of their creation:


Check out the video to see how it works.

It needs a little bit of tweaking...the icing comes out in squiggles and blobs. But I'm impressed! Aren't you???

Thursday, January 27, 2011

Orange & Blue Gift Cake

I'm behind on editing my cake photos again so I'm down to slim pickings for posting...but I like this cake so I don't feel like you're getting gypped!

blue orange white gift cake bow
It's just a simple square cake covered with blue fondant, topped with a fabulous orange gum paste bow, and decorated with white polka dots.

blue orange white gift cake bow
What better way to say "happy birthday" than with a cake that looks as good as the gift pile! And it tastes SOOOO much better.

Monday, January 24, 2011

New Year's Eve Cake Party!

The cake decorating birthday parties at Ms Debbie's Sugar Art have really been picking up lately!
Here are pictures from one I did on New Year's Eve:

cake decorating birthday party
These girls were very organized. I showed them how to make ribbon roses, fondant bears, zebra print, and various piping techniques. As usual, I brought a bunch of different sprinkles for the to use, but the party mom really got into it and purchased a bunch more so the girls had lots to choose from!

cake decorating birthday party
I loved her bright orange finger nails!

cake decorating birthday party
And the girl who created this cake has a passion for cake decorating. She brought along a plethora of her own tools and cake decorating books. In one of the books, she'd already picked out which cake she was going to make - one with 4 teddy bears eating a picnic. Her bears were sitting on couplers - how creative! And she hand-made all the food, plates, birthday cake, etc!

cake decorating birthday party
When the girls finished their cakes, they moved on to decorating cupcakes the party mom had baked. Yum!

cake decorating birthday partyWith all that sugar, I don't think the girls had any trouble staying awake until midnight.

Wednesday, January 19, 2011

Successfully Entering and WINNING Cake Decorating Competitions

Well, the 1st Annual Florida ICED Cake Competition is only about 2 months away now! If you're planning to compete (which you should), you're at least beginning to think about your entry.

At most cake decorating competitions, the competition pieces are actually completed ahead of time. Typically, the competitors decorate "cake dummies" which are Styrofoam pieces in the shape of cake tiers. And then they decorate them using edible mediums like buttercream, royal icing, fondant, gum paste, modeling chocolate, etc. There are many places to buy cake dummies, but I buy mine from Dallas Foam. In fact, if you use another source, leave it in the comments!

Here are my 10 suggestions for how to successfully enter and WIN cake decorating competitions:
1. Know and Understand the Rules
  • Competitions come in all shapes and sizes with very different rules. Read through the rules a few times, making notes in places that are unclear or raise questions in your mind. Don't be afraid to ask the show coordinators your questions! If something is unclear, I'm sure they'd be more than happy to help you understand.
  • Don't be disqualified or lose points in the competition because of a simple rule misunderstanding!
2. Know Your Judges and Their Likes & Dislikes
  • The judges make the ultimate decision of who wins and loses so please them with your entry. If you know one judge is particularly fond of stringwork, use it! If you know one judge absolutely hates "elephant skin" on cakes, be careful to avoid it at all costs.
3. Think Outside the Box
  • Most cake decorating competitions have a theme. Go above and beyond the theme with your entry! Make people think, "Wow, why didn't I think of that?!" Draw the eye to YOUR entry and impress both the public and the judges with your creativity.
  • For example, the FL ICED Cake Competition theme is Romantic Wedding Dresses. Think crazy! Do a wedding dress from the Victorian Era, or one from the future, or one made entirely of peacock feathers!
4. It Must be Your Original Work
  • It is OK to draw inspiration from other cakes or works of art, but you need to change them to add your own twist. You cannot and will not win if you are merely copying what someone else has already done.
5. Make Your Entry Visually Appealing and Appetizing
  • Use appropriate color combinations. That's not to say you can use black and hot pink - as long as it looks nice and goes with the theme. But don't use colors like black, orange, and red if it's a Christmas-themed competition!
  • This is a tricky thing to do correctly. In the long run, you're going for a design that has mass appeal. It's ok to go funky at times, but there has to be something in it that everyone will like. For example, if you go with the peacock feather wedding dress: Not everyone would like that kind of dress. But you'll appeal to the masses because they'll be impressed with your use of color and your talent in pulling off a difficult technique like that.
6. Demonstrate a Mastery of Techniques
  • You must use precision, uniformity, and (near) perfection on your competition entry. You have to demonstrate that this is NOT the first time you've attempted a technique (even though it may, in fact, be). You need to make the techniques look very cleanly executed and as if they were easy for you to complete.
7. Demonstrate a Number of Techniques
  • This is another tricky one. The judges will want to see that you are well-versed in many different cake decorating/sugar art techniques. Can you cover a cake with fondant? Can you make fondant figures? Can you do stringwork?
  • However, there is a fine balance between demonstrating that you can do many techniques and overloading your cake with "over decoration" just to demonstrate the techniques. Choose your favorite techniques - ones that go with the theme, fit your cake design, and show the highest level of difficulty - and use those.
  • A cake decorating competition is not typically where you want to try a new technique for the first time, unless you are confident that you can MASTER it (see #6).
8. It's All in the Details!
  • Make people stop at your entry and try to get closer to examine all the fine details on your cake. Give them the impression that they need to admire your cake for hours to get a full appreciation of everything on it.
  • You want to impress the judges and the public with your overall design...draw them over for closer inspection...and blow them away with the little details!
9. Prepare for the Worst During Delivery
  • Things happen - bumps in the road, bad drivers, etc! Prepare an "oops" kit so that you can repair ANYTHING that gets damaged upon delivery to the competition. At this point, you've spent hours on your competition piece. If something breaks, take the time to repair it!
  • Similarly, take advantage of the set-up time the competition organizers have allowed you. If they give you a 3-hour block to set up your piece, get there early! If you have time leftover, great! But you never want to run out of time setting up.
10. Please Yourself
  • At the end of the day, YOU are taking the cake home again. Are YOU happy with the design? Are YOU happy with the effort you put into it? If YOU aren't happy with your competition piece, how can you expect anyone else to like it?!
  • Please yourself and learn something from your competition experience. Talk to other competitors about their experiences and techniques they used.
  • AND HAVE FUN!

Monday, January 17, 2011

Scientific Groom's Cake

This is the groom's cake that sat alongside the Mango Calla Lilly Wedding Cake at Sweetwater Branch Inn.

Jeremiah & Megan are in the same doctoral program I was in at the University of Florida. Jeremiah specifically studies pain receptors and uses an apparatus that looks a lot like this one (and is technically called a Thermal Preference Apparatus):


So the goal for the groom's cake was to replicate it! Here's the cake:

modeling chocolate rat thermal preference apparatus cake
The yellow is all buttercream. The walls of the apparatus were made of gum paste that was allowed to dry for 1 week. The other decorations are fondant, and the numbers are hand-piped with royal icing.

modeling chocolate rat thermal preference apparatus cake
Oh, and the little rat was made out of modeling chocolate.

modeling chocolate rat thermal preference apparatus cake

Sunday, January 16, 2011

Hershey's Baking Pack WINNER!

Wow, you guys must LOVE Hershey's! This is, by far, the most comments I've received during a giveaway - 421 eligible comments!

And the winner is...


cstironkat said... 160

1/7 tweet #2 http://twitter.com/cstironkat/status/23420656339132416

January 7, 2011 11:49AM


Thanks for entering, everyone! And keep baking!

Thursday, January 13, 2011

My Sugar Cookie Recipe

People keep asking, what recipe do you use for your rolled cookies? It's no secret. I got it from Cooking Light Magazine (my favorite, by the way)!

2 1/2 cups all-purpose flour (about 11 1/4 oz)
1/2 teaspoon baking powder
1/4 teaspoon salt
1 cup granulated sugar
10 tablespoons butter, softened
1 1/2 teaspoons vanilla extract
2 large egg whites

Lightly spoon flour into dry measuring cups; level with a knife. Combine flour, baking powder, and salt, stirring well with a whisk. Place granulated sugar and butter in a large bowl; beat with a mixer at medium speed until light and fluffy. Beat in 1 1/2 teaspoons vanilla and egg whites. Gradually add flour mixture to butter mixture, beating at low speed just until combined. Divide dough in half. Shape each dough half into a flattened disk; wrap each disk in plastic wrap. Chill 1 hour.

To bake: Unwrap 1 dough ball and place on heavy-duty plastic wrap. Cover with additional plastic wrap. Roll dough, still covered, to 1/4-inch thickness. Repeat procedure with remaining dough ball. Chill dough 30 minutes.

Preheat oven to 375 degrees F.

Remove one dough portion from refrigerator. Remove top sheet of plastic wrap; turn dough over. Remove remaining plastic wrap. Using a 2 1/2-inch cutter, cut dough into 18 cookies. Place cookies 2 inches apart on baking sheets lined with parchment paper. Bake for 10 minutes or until lightly browned. Cool on pans 5 minutes. Remove cookies from pans; cool completely. Repeat with remaining dough half.

Ok, that's the recipe straight from Cooking Light. But, now here's how I do it:

-Prepare the dough as directed, but I like to chill mine overnight.
-Spray a Silpat with Pam for Baking spray. Set the dough on the Silpat and spray the top of the dough a little. Roll dough to 1/4-inch thickness, and cut cookies with desired cookie cutters.
-Remove excess dough. Rewrap it in plastic wrap and place in the freezer or refrigerator to stay chilled.
-I work on 3-4 Silpats at a time so that I have one loaded with cookie cut-outs and ready to go in the oven.
-Each cookie shape will bake a different length of time so I just keep an eye on the first batch. I remove them JUST BEFORE the edges start to brown. It's tricky...that part takes practice.
-The key is to keep the dough chilled while you work with it. If it becomes too warm, it will stick to EVERYTHING. If that starts to happen, wrap it back up and stick it in the freezer for a few minutes.

When I decorate my cookies with Royal Icing, I use Wilton's recipe. And, for fondant, I like Satin Ice.

Fondant Cupcake Cookie Tutorial

I decided to try a new technique on a cookie yesterday. So many people decorate sugar cookies with royal icing or glaze...But can you make them super cute with fondant?!

fondant cupcake cookie whimsical girly pink blue green tutorial
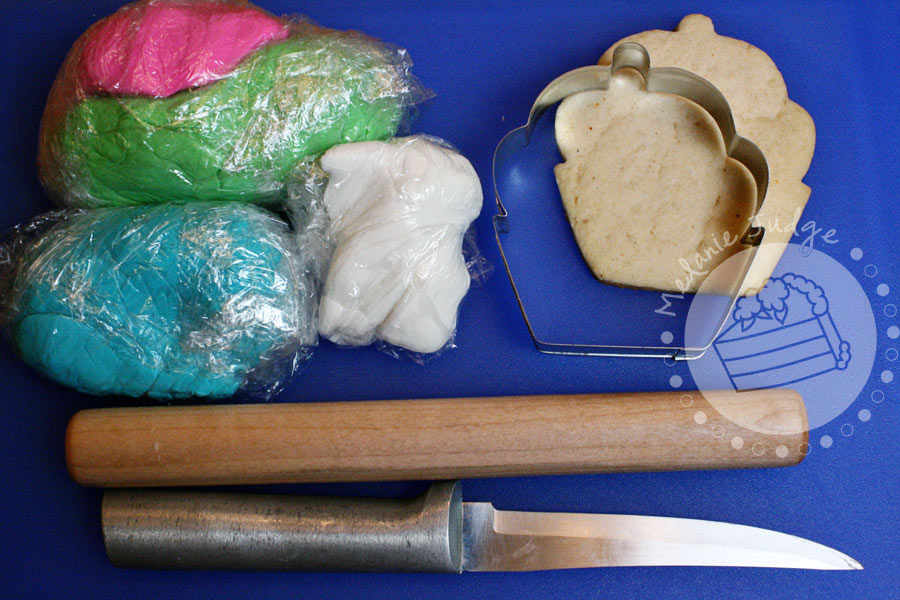
I'm thrilled with how these came out. And - best of all - you don't need any special tools! My tools were all at the bakery so I had to do with what I had lying around the house. So, because I love all of you, here is a tutorial so you too can make adorable fondant-decorated cupcake cookies. Enjoy!

Here's what you'll need:
-fondant in your choice of colors
-the cookies, of course!
-the cookie cutter you used (I used this one from Crate & Barrell...a gift from Nicole!)
-a rolling pin
-a sharp knife

fondant cupcake cookie whimsical girly pink blue green tutorial
Step 1: Roll out your first choice of fondant color. I don't measure the thickness of my fondant when I work, but you probably want to shoot for about an 1/8 of an inch thick.

Then use the cookie cutter to cut the cupcake wrapper part out of the fondant.

fondant cupcake cookie whimsical girly pink blue green tutorial
Step 2: Use your knife to cut the top of the cupcake wrapper in a wave motion. Discard the excess fondant.
fondant cupcake cookie whimsical girly pink blue green tutorial
Step 3: Spread a thin layer of buttercream icing on your cookie and set the cupcake wrapper part on it!

fondant cupcake cookie whimsical girly pink blue green tutorial
Step 4: Roll out white fondant to 1/8 inch thick, and use the cutter to cut out the icing part of the cupcake.

fondant cupcake cookie whimsical girly pink blue green tutorial
Step 5: Trim the cherry off the top and trim the bottom with a straight cut - all the way across. Then, stick it on your cookie!

fondant cupcake cookie whimsical girly pink blue green tutorial
Step 6: Use your finger to push the white fondant down into the waves of the pink cupcake wrapper. Work relatively quickly to get the fondant where you like it. If you work too slow, your fondant will crack, tear, wrinkle, or have any number of undesirable consequences.

fondant cupcake cookie whimsical girly pink blue green tutorial
Step 7: Use the BACK of your knife to put creases in the cupcake liner. To do this, I just pushed the knife down into the fondant. If you have a straight edge on the back of your knife, there's no need to actually move the knife up or down (which could tear the fondant)...just push down into the fondant and lift!

fondant cupcake cookie whimsical girly pink blue green tutorial
Step 8: Choose another color of fondant and roll a super thin rope out of it. The thickness of your rope will determine the size of your sprinkles so keep it thick if you want big, whimsical sprinkles. Then, using your knife, cut the rope into pieces that range between 1/8 to 1/4 of an inch long. Again, you can adjust this to how you want your sprinkles to look.

fondant cupcake cookie whimsical girly pink blue green tutorial
Step 9: Lay your sprinkles on the top of the cupcake in a random fashion. These are just sitting on the cupcake at this point - they are in no way adhered to the fondant so don't make any sudden movements or bump the table.

fondant cupcake cookie whimsical girly pink blue green tutorial
Step 10: Using your rolling pin, gently roll over the sprinkles to "smoosh" them into the white fondant. This should adhere them to the surface! If not, apply a small amount of water under the sprinkles and that should do the trick.

fondant cupcake cookie whimsical girly pink blue green tutorial
Step 11: Choose a third color of fondant and roll it into a tiny ball. Using a little dab of buttercream, attach the ball to the top of the cupcake.

fondant cupcake cookie whimsical girly pink blue green tutorial
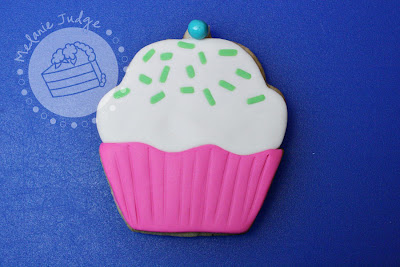
Step 12: Then "smoosh" the ball with your finger!

fondant cupcake cookie whimsical girly pink blue green tutorial
Done and done! Great job! If you make any cookies using the techniques or cookie cutter I used, send them to me! You may be the Friday Feature on Mel's Cake Walk Facebook Fan Page! Ooooh, aaaaah. *grin*

Wednesday, January 12, 2011

Mango Calla Lily Wedding Cake

Here's another wedding cake from back in October 2010. This one was done for some friends who were in the same doctoral program as me at the University of Florida. I'll post the groom's cake tomorrow - it's very "scientific."

mango calla lily buttercream embroidery wedding cake
Megan and Jeremiah got married at the Sweetwater Branch Inn, where they set up the wedding cakes in front of a gorgeous mirror in the foyer area.

The cake was iced in buttercream, and here is a close-up of the gum paste Mango Calla Lilies cascading down the cake and the hand-piped details that matched the embroidery on Megan's dress.

mango calla lily buttercream embroidery wedding cake
Their wedding photographer was another friend of mine: Elise Kersey. Here are the shots she got:

mango calla lily buttercream embroidery wedding cakemango calla lily buttercream embroidery wedding cake
mango calla lily buttercream embroidery wedding cake

Tuesday, January 11, 2011

Seven-Tier Wedding Cake in St. Augustine, FL!

This wedding cake is from back in October...why haven't I posted it before now? Your guess is as good as mine! But I think you'll all really like it.

It was a seven tier wedding cake - all decorated with white and ivory fondant.

st augustine fondant white ivory lace swags quilting drapes wedding cake
The cake topper was a dome of white and ivory gum paste flowers, and the top two tiers were decorated with fondant swags, lace, and quilting.

st augustine fondant white ivory lace swags quilting drapes wedding cake
Then we had some ivory fondant stripes, more lace, more quilting, and a lot of fondant pleats around the base!

st augustine fondant white ivory lace swags quilting drapes wedding cake
While I was in the middle of setting up the cake, the bridesmaids announced that Caroline was dying to see her cake! So, I moved all my stuff aside and...here comes the bride!

st augustine fondant white ivory lace swags quilting drapes wedding cakest augustine fondant white ivory lace swags quilting drapes wedding cake
I think she liked it.

st augustine fondant white ivory lace swags quilting drapes wedding cake
And I think she was even more excited to cut into it!

st augustine fondant white ivory lace swags quilting drapes wedding cake
After tasting the cake, Caroline gave the camera a thumbs-up...yummy! But, wait a minute, Rob has icing on his finger...and a rather sinister look on his face. Don't do it, Rob! Do NOT rub that icing on Caroline's gorgeous nose!

*Thank you to Dana Goodson Photography for providing such amazing photos of the cake and cake cutting! See more of her shots of the wedding here.

Monday, January 10, 2011

BCS National Championship 2011

Tonight will wrap up this year's college bowl season. I LIVE for college bowl games so I'm sad to see it ending again...but I can't wait to watch tonight's game! It's the BCS National Championship Game - Auburn versus Oregon!

Two of my good friends, Ben & Shelby, moved to Oregon last year and are HUGE University of Oregon fans. Shelby wanted to surprise Ben with some Oregon cookies for the big game...so this is what I sent them:

2011 bcs national championship cookies oregon auburn football
Go Ducks!

Thursday, January 6, 2011

Black & White Damask Wedding

This has to be one of my favorite cakes that we did recently. The bride wanted the cake to be black & white Damask. Now, normally, we just do black Damask royal icing on a white fondant-covered cake, but for this one we alternated the tiers with black and white fondant. Then, we used the opposite color for the royal icing Damask pattern.

Oh, and this was my FIRST time attempting the Damask technique!

black white fondant wedding cake
Isn't it purdy???

I thought so. And when we arrived to deliver the cake, I thought it matched the rest of the wedding PERFECTLY!


black white fondant wedding cake
black white teal wedding adore eventsblack white teal wedding adore events
I love this black & white candy favor bar:

black white teal wedding adore eventsblack white teal wedding adore events
And while I was zipping around taking photos, I noticed the hubs was slowly, silently wandering the room. What was he doing? Checking out the air conditioning. That's what an HVAC mechanical engineer does...checks out the venting and duct work in EVERY building we go to. Joy!


The room decorations and event planning were done by Adore Events. Check out their page for some before & after shots and more photos from the wedding.