Today, I'm going to show you a few quick things you can do in Photoshop to enhance your cake photos. Of course, this tutorial will be geared towards cake decorators, but the same principles can be applied to many other uses!
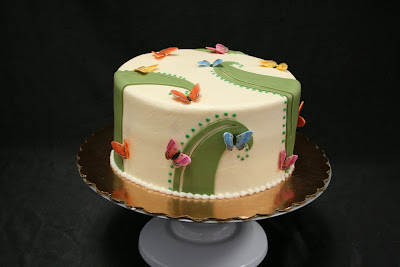
For the tutorial, I'll use a photo of a cake I made for my Grandma's birthday a few weeks ago. The cake was iced in ivory buttercream and decorated with whimsical green fondant swirls and gum paste butterflies.
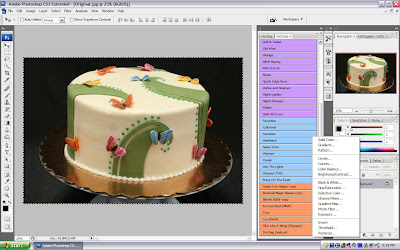
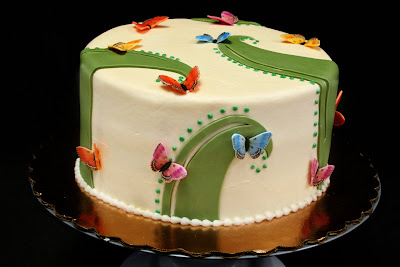
This is the photo straight out of the camera:
Not too shabby, but there's definitely room for improvement! Here's the final photo of the cake after I've made some slight adjustments and added the watermarks:
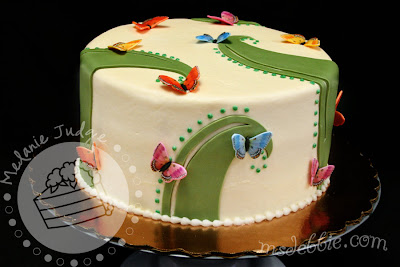
Again, they were only small adjustments, but I think you'll agree that the cake looks more appealing, professional, and fun!
For this tutorial, I'll be using Adobe Photoshop CS3 and "actions" from both
Pioneer Woman and
Totally Rad Actions. The action sets are free downloads so take advantage of them! If you like what you see, you can always purchase more, but I do all my editing with the free versions. If you have a different version of Photoshop, your screens will look slightly different, but you should be able to do all the same techniques.
And if you want to see a larger version of any of the screen shots I've included in this post, just click the image.
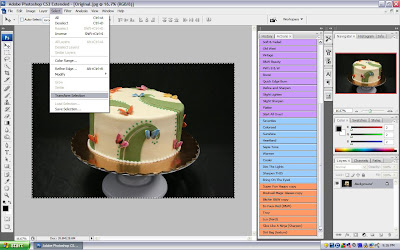
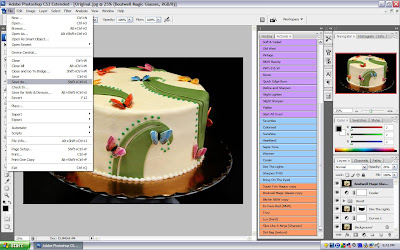
Step 1: Open Photo and Crop ItOpen your image in Photoshop. Then, click "All" from the Select drop-down menu. This will give you a dotted line around your image (see below). Next, choose "Transform Selection" from the Select drop-down menu.
This will change the dotted border around the photo to a solid line with boxes on the corners. Hold down the SHIFT button on your keypad and drag one of the corners in so that it fits nicely around your cake. Holding SHIFT keeps the proportions of your photo constant. That way, if you try to print copies later, nothing gets chopped out of the photo! And if you don't care about photo dimensions, don't bother holding down SHIFT.
When you have adjusted the rectangle around your cake, hit ENTER. This will change the border back into a dotted line (see below).

Now click "Crop" in the Image drop-down menu. Now your photo is cropped! If you need to zoom in a little, just hit CONTROL and the + on your keypad simultaneously.
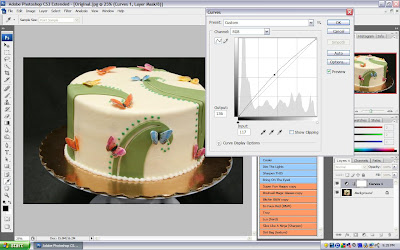
Step 2: Adjust CurvesThe first thing I do is adjust Curves. What is curves? Don't ask me. Photoshop is a program that has lot of potential to do some amazing stuff...but right now, a lot of it is over my head. I know what I'm telling you today, and that's about it.
So back to Curves. To open the Curves box, click the small symbol on the bottom right of your screen. It's a circle that's half black and half white. When you click that, a menu will pop up - click "Curves."
When the curves box pops up, it will look like a fancy graph from math or science class. Ooooo, fancy! Grab the very center of the diagonal light and move it a smidgen to the left. Look below to see where I moved my line. Doing this will very slightly lighten your entire photo. Be careful not to move the line too much - you want all your edits to look very natural! When you're ready, click "OK."
Now, if you look in your "Layers" box on the bottom right, you should have a "Background" layer and a "Curves 1" layer. Click the little eyeball image to the left of the Curves 1 layer to turn it off and on. See what a difference even something that simple made?
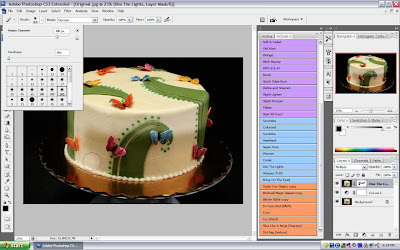
Step 3: Dim the LightsFor this step, we're going to use the Dim the Lights action from Pioneer Woman. On my screen, the actions are listed in those colorful boxes to the right. Find Dim the Lights and click it. The whole screen will instantly get darker. I know you're thinking, "Why'd we do that? We just lightened it!" Bear with me, dear friend...
Now select your paint brush from the list of icons on the far left of your screen. Once you select the paint brush, the tool bar along the top will show your brush size. I like to use a brush with 300 pixel diameter and 0% hardness. This means that the edge of the brush is very soft so you don't get really hard, bold lines on your photo. However, if your cake is small, you may need to use a smaller brush size.
Also, make sure that your color selection is correct. The color selection is shown on the bottom left of your screen in two overlapping squares. For this task, you want the top square to be black.
Now, go over to your cake and "paint" over the side of the cake. What are we doing this for? Well, we've just dimmed the lights, but now we're erasing that effect off the side of the cake. When we're finished, it will reduce the glare that any overhead lights put on the top of the cake.
Here is a screen shot while I am painting on the Dim the Lights layer (for those of you who care, this is called editing a Layer Mask):
At this point, you can also edit the Opacity of this layer in your Layers box on the lower right of your screen. If Dim the Lights made your cake too dark, back it off a bit...to 80%, 50%, or even 20%. The percentage will change from cake to cake, so just use your judgment.
Step 4: BoostThis is an easy step! Find Boost in Pioneer Woman's action sets and click it.
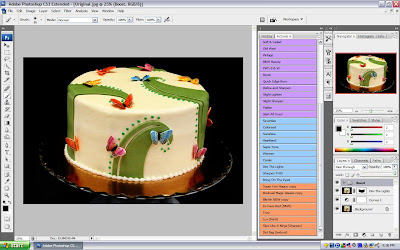
Phew, that's a blast of color! But it doesn't look natural, so back it off quite a bit. For this cake, I took the Opacity down to 34%. Again, this is something that will change for each cake/photo.
 Step 5: Cooler
Here's another easy step for you. Click the Cooler action on Pioneer Woman's action set. Again, 100% opacity is just too strong for this effect so back it off. For this photo, I used 21% opacity.
This will just take a little yellow out of your photo. For example, if you take a picture of a white cake, it often looks slightly yellow/ivory on the computer. Adding just a little of the "cooler" effect will take that yellow out and really enhance your cake!
 Step 6: Boutwell Magic Glasses
You've made it! This is the last photo editing step! This one is so easy because the action does all the work for you! Click Boutwell Magic Glasses from the Totally Rad Actions set. This will sharpen and boost (even further) your photo. Like usual, adjust the opacity so that the sharpness isn't overly done. For this photo, I used 26% opacity.
 Step 7: Save the File
In the File drop-down menu, click Save As and save the file as a jpeg. I never save the edited image over the original one. You never know when you'll want to re-edit the photo so keep the original as it is straight out of the camera.
This is my edited cake photo:
 Step 8: Add Watermark
If you plan to upload your cake photo to the internet in any form (a cake forum, Facebook, blog, etc.), I highly recommend that you watermark the photo in some way. This can be accomplished even if you don't have a cute watermark like mine (thanks, Mikkel!).
If you have a watermark, just copy and paste it onto your cake photo. It'll be added as a new layer on top of your old ones so you can adjust the opacity and move it around the photo.
If you don't have a watermark, just choose the Text tool from the left-hand bar and black color. Type right on your photo - your name, your website, your business, etc. You can move it wherever you think it looks best (I like mine off to the side of the cake so it's not blocking any details).
I always change the opacity to 40% on both the watermark and the text. It's a number I chose arbitrarily so do what you like.
Step 9: Change Image SizeOften, the image straight out of your camera is rather large - too large to load onto any website. Facebook and sites like that will automatically resize your image somewhat, but it's always best to reduce the size yourself.
To do this, click Image Size from the Image drop-down menu. I just set my height to 600 pixels. If you have the "Constrain Proportions" box checked at the bottom of the dialog box, the program will automatically adjust your height for you. Click OK.
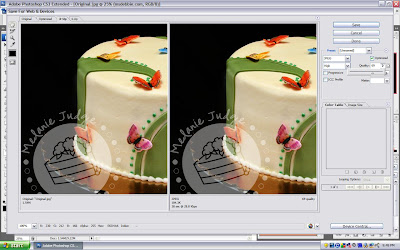
 Step 10: Save for Web & Devices
Now, click "Save for Web & Devices" in the File drop-down menu.
A new window will open up within Photoshop, showing 2 images side-by-side. The left image is the original image; the right image will change as you shift the Quality. I adjust my quality so that the right image is approximately 100kb. An image of this size will load quickly on a web page but still shows good quality so people can view the details.
Click Save.
You're done! You made it! Great job!
If you feel intimidated right now, know that you're not alone! I am the furthest thing from a photographer or Photoshop expert. It has taken months for me to nail down these steps to enhance the photos, without changing the way the cake really looked. Photoshop is not an easy program to get the hang of if you have no experience with it. My best advice is to just play around with it. Start with the steps I've described above and see what else you can do! It will get easier if you stick with it, I promise.
If you come across any actions or Photoshop techniques that are worth sharing, please do! Like I said, I'm no expert so let's all learn from each other.