Tuesday, July 26, 2011

Lego Pirate Cake

I posted another sneak peek on the Facebook Fan Page last week. Did you see it?! I thought the photo was a little more cryptic this time, but you guys were still able to guess! I'll have to get a little more creative in my photography in the future...

lego pirate ship birthday cake photofrost
So, yes, it was a pirate ship cake. But not just any pirate ship! It was a Lego pirate ship made especially for Adam's youngest cousin, who just turned 7 and is absolutely obsessed with all things Lego.

lego pirate ship birthday cake photofrost
The ship was carved out of cake and "wallpapered" with wood grain-printed edible paper fresh from my new PhotoFrost edible printing system. Now, before you all ask me, "Where did you find the amazing wood grain image???" Here's a secret: I just googled it! Here's the one I used, which came up with a search for "wooden planks."

lego pirate ship birthday cake photofrost
I made a special mold using real Legos so that I could, in turn, create edible ones for the cake. And all the decorations (anchor, Lego people, sails, treasure map, etc) were made of gum paste.

lego pirate ship birthday cake photofrost
In fact, Noah specifically requested that his "squid man" be driving the pirate ship. Now, I wasn't about to try to carve that detailed, tiny character from red gum paste so I simply made a mold of the real thing! The one you see in the picture above is made from gum paste. I am now in love with molding putty!

Noah's party was held at the local skating rink. I used to spend all day Saturday at the skating rink when I was growing up...*sigh* those were the days. And you know what? They still use the same fluorescent carpet on the walls! When we arrived at the party with the cake, the staff put it on a counter so skaters-by wouldn't damage it. Noah stood there staring at it for at least 15 minutes.

lego pirate ship birthday cake photofrost
Then some random little boy walked up and Noah announced, "That's my birthday cake! My cousin made it!"


lego pirate ship birthday cake photofrost
I think he liked it. What do you think?

Friday, July 22, 2011

Firetruck Cookies

A couple of days ago, I posted a sneak peek on Facebook of some cookies I was working on. It looked like this:

firetruck cookies sneak peek
Did you guess what it was??? Yea, I guess it wasn't too hard to figure out...

firetruck cookies
The firetrucks were made for a sweet little boy's birthday. They were labeled with each party attendee's name and shipped out of town (arriving today). Happy Birthday, West!

Did you like the Sneak Peek game? I had fun with it! But maybe next time I'll make it a little more challenging...and maybe every once in a while I'll run it like a contest. I'm thinking the first correct guess wins a dozen cookies shipped directly to them. How does that sound? These Sneak Peek games and contests will only be announced on my Facebook Fan Page so be sure you "like" it so you can play!

Wednesday, July 20, 2011

Disney Wedding Favors

I've been a bad blogger. With trying to get Ph.D.-serts & Cakes set up for business, blogging just hasn't been on the top of my to-do list! But here are some photos of goodies I did a while ago for a friend's Disney wedding.

The Disney chefs did the wedding cake itself (and it was gorgeous), but I was honored to be asked to do the party favors!

Of course, there were Mickey Mouse cookies:


And Minnie Mouse cookies:


Here's the cute couple now!


And then they wanted cookies that said "...and they lived happily ever after." To make these, I covered the cookies with white Satin Ice fondant and let it harden. Then I wrote the message with edible food markers and piped a tiffany blue royal icing border. But the last step was probably the most important...a little sprinkling of Pixie Dust (aka Disco Dust)! Can you see it? These cookies looked magical!


But that's not all! They also wanted chocolate-dipped pretzel sticks - yum! Each guest received a pretzel dipped in white chocolate, milk chocolate, and dark chocolate. Is your mouth watering? All of a sudden, I'm craving one dipped in dark chocolate...


Oooo! I almost forgot! The last treat the guests got was Chess Bars!


If you've never had Chess Bars, I feel sorry for you. They are rich, decadent, sweet, and irresistible. I can't share my recipe because it was a family recipe I talked my friend into sharing, but I know you can find a similar recipe online. Oh, look! Here's one you can try! Hmmm...maybe I'll make some this week...


Wouldn't you love to be a guest at this wedding? Not only is it at Disney, but then you get pampered with all these goodies!

Congrats, Chris and Kate! "All you need is faith, trust, and pixie dust."

Thursday, July 7, 2011

A Rainbow-Themed Baby Shower!

Last weekend, my Mom and sister, Robin, threw me an amazing rainbow-themed baby shower! The food was great (Pizza Gallery & Grill in Viera, FL), the games were fun, and the company was irreplaceable!

I have never been able to choose a favorite color because I love all colors! Colors are meant to compliment each other so why would you want to choose only one??? So when my sister picked the rainbow theme for the shower, I couldn't have been happier. One of my favorite parts of the decor was this rainbow jelly bean bar.

rainbow baby shower jelly belly bar
My crazy sister actually carried all these jelly beans on her flight with her from TX. HEAV-Y! But, oh so yummy.

My cousin Heather volunteered to make the shower cake, which turned out adorable and was also quite yummy! She even used the new Wilton edible paper decorations! And, since everyone was bringing me gifts, I felt like I should provide the party favors. Here's a shot of our colorful cake/favor table at the shower:

rainbow baby shower favors and cake
The favors included:
-Cupcakes topped with mini doughnuts (I bought this new Wilton pan at the annual Tent Sale.)


-Rainbow macarons (Not to be confused with macaroons, of which I have recently been guilty. Tutorial coming soon!)

rainbow baby shower rainbow macarons
-Baby candy sticks using this Wilton mold but I mounted them on Tutti Fruity candy sticks from Cracker Barrel instead of pretzels

rainbow baby shower baby candy tutti fruity sticks
-And lots and lots of decorated sugar cookies that looked like cupcakes, ice cream cones, lollipops, and dot strips

rainbow baby shower cookie favors ice cream dot strips cupcakes lollipops
The table decorations were so cute, and I loved the Whirly Pops in the sequined Jelly Belly jars!

rainbow baby shower jelly beans jelly belly whirly poprainbow baby shower jelly beans jelly belly
I have to tell you about the games we played because they were actually fun!

Birthday Cards for the Baby:
-While we were waiting for all the guests to arrive, we all made baby Mikaela birthday cards! Everyone was allowed to choose whichever year they wanted. The idea is that they were supposed to share a fond memory of themselves and/or me at that age. Or, they could give Mikaela some advice for that age. At first, it was hard to figure out what to write, but I'm so glad we did this! Mikaela now has birthday cards from her baby shower from age 1 to age 24! And they're all sealed so it will be fun to read them together as the years go by.

Gift Bingo:
-Robin pre-made bingo cards with things from our registry: diapers, swing, bouncer, Boppy, onesie, mittens, etc. While I opened gifts, the guests all played Bingo! I really liked this game because it kept people from focusing all the attention on me. I'm not a big fan of opening gifts in front of a crowd so this was a nice distraction. And, BONUS, one of the guests gets to win a prize!

Guess the Girth:
-And, of course, we played the Guess the Girth game. A ball of yarn was passed around and everyone cut off a segment they thought would fit perfectly around my baby bump. This game is always a fun one!


Amazingly, those are the best baby bump photos we got during the shower. Whoops! But here are my other 2 favorite photos from the day:

Grammy (my Mom), me & Mikaela, and Mimi (Adam's Mom)


And a photo with my beautiful sister, Robin.

*All photos without my watermark were taken by Julie from The Little Kitchen. Thanks, Julie! You're awesome!

Monday, June 27, 2011

The Big Cookie Reveal!

Last week, I posted this picture:

summer teacher vacation cookies margarita watermelon
And I told you the cookies were a surprise for someone very important in my life. Did you guess who that person was???

My mom!

Coincidentally, one of my Mom's former students (she's a 5th grade teacher in TX) was in Florida on vacation with her family. Her Mom saw my temporary Ph.D.-serts & Cakes website and called me. They wanted to bring some surprise cookies back to my Mom! How sweet is that?!

So I decided to do a "Summer Teacher" cookie mix.

summer teacher vacation cookies
She received chalk boards, pencils, watermelon, beach balls, sunglasses, cupcakes, and ice cream cones. When I think of "teacher on vacation," that's what comes to mind!

The best part was that Mom had NO CLUE! *insert evil laugh here* I love being sneaky like that.

Friday, June 24, 2011

Rolled Sugar Cookie Process & a Sneak Peak

People ask me all the time how I bake my sugar cookies so that they don't burn or spread while baking. I've posted my sugar cookie recipe here before, but let's go through my whole process today so you can see it from start to finish.

*Disclaimer: There are MANY different methods to rolling out cookie dough. This method may or may not work for you. It's what works for me. Period.

Step 1: Make Sugar Cookie Dough
I use this recipe from Cooking Light Magazine. I always mix up the dough at least 1 day in advance and store it in the refrigerator so it's nice and chilled when I'm ready to bake.

Step 2: Roll Out Dough
Here are the tools you'll need:
-1 rolling pin (silicone-coated works best)
-nonstick baking spray
-cookie cutters of choice
-SilPat
-1 batch of sugar cookie dough

rolled sugar cookie process how to
Spray SilPat with baking spray and place dough on top. I give my dough a good smoosh with my hand so it's a little easier to roll (remember, it's chilled so it's very hard). Then spray the top of the dough with baking spray.

rolled sugar cookie process how to
Roll out the dough. If it's sticking to your rolling pin, spray the top of the dough again with baking spray. You don't need a perfect rectangle/circle when you roll. In fact, I usually use only 1/4 of the sugar cookie dough (the rest is stored in the fridge) and work on only one side of the SilPat.

rolled sugar cookie process how to
Do you have trouble keeping your dough an even consistency throughout? Try using Wilton's 20-inch rolling pin with guide rings to get an even thickness. Or, place one wooden dowel on either side of your cookie dough and roll on top of that. Both the guide rings and the wooden dowels will only let you go to a certain thickness so you won't get super thin spots in your rolled dough.

Step 3: Cut out Cookies
Using your chosen cookie cutter, cut out your cookies from the rolled dough. Don't cut them too close together, though, because they will spread a little bit while baking.

rolled sugar cookie process how to
Step 4: Tear Away Excess Dough
Peel up the excess dough around the cookie cut-outs. Simple as that! It should come up really easily since you sprayed the SilPat with baking spray. If it gives you trouble in spots, slide a thin spatula underneath it. Of course, be careful not to nudge your perfectly shaped cookie cut-outs.

rolled sugar cookie process how to
Step 5: Repeat Until SilPat is Full
Now, I have to mention here that some people like to freeze the shapes at this point. Then, you could pick them up and move them around the SilPat. This would allow you to fit more shapes on 1 pan and reduce your total amount of baking time.

I'd rather just bake what I can fit on a pan, and continue rolling on another SilPat. When I bake cookies, I have 4 SilPats going at a time so I've always got one ready to go in the oven.

rolled sugar cookie process how to
Step 6: Bake!
Baking time will depend on your oven and the size of your cookie. If I'm unsure how long the cookie size will take to bake, I usually set the timer for 7 minutes and check it then. Your cookie should not be shiny at all when it's finished baking.

That being said, it'll take some practice to know when to remove the cookies from the oven. Ideally, you want to remove them JUST BEFORE the edges start to turn brown. In the image below, two of the cookies are perfect, but the one in the left rear started to get a little brown. A little brown like that is ok because your decorations will probably mask it. Yay!
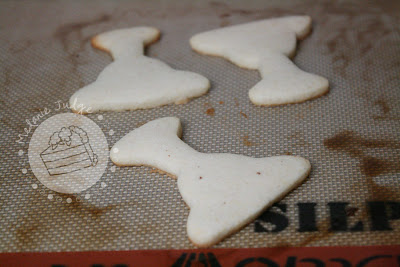
rolled sugar cookie process how to
Let the cookies sit for 1-2 minutes on the pan. This will allow them to harden a little. When they're hard enough to lift (they don't break when you lift them), move them to a cooling rack to cool completely.

Step 7: Repeat!
Just keep repeating the above steps until you've used all your dough. If the dough starts to get too warm, it'll get really sticky. When I'm done working with some dough, I throw it back in the fridge or freezer. The key is to keep it chilled!

Now you may have also noticed in the picture above that after you bake, the baking spray on the SilPat turns brown. Not very appetizing, right?! Well, it won't do much damage. If you roll your dough on top of that, the dough will start to turn brown a little, but it won't change the flavor. If you want to avoid the color change, just wipe the SilPat with a paper towel before you roll dough out on it again.

rolled sugar cookie process how to
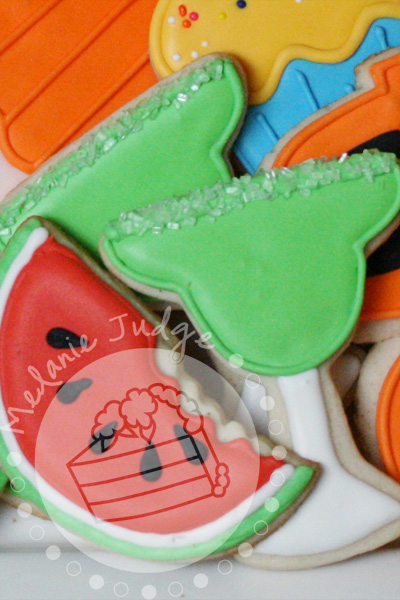
So, why was I baking cookies this week? Well, I can't reveal that yet...but I can tell you it was a surprise for one of the most amazing people in my life. Here's a sneak peak of the finished cookies:

margarita cookies sugar decorated
And I have no problem showing you that sneak peak because these margarita cookies actually broke while I was packaging them! So this person won't even receive them...I already ate them! Stay tuned for the big reveal of the rest of the cookie batch and the recipient next week!

Baby Gender Reveal Parties

(Photo from MailOnline.com)

Have you heard of the baby gender reveal parties? I am in love with this idea, and I've been dying to convince my friends to let me bake their gender reveal cake. Ok, let's backtrack. What's a gender reveal party?

Well, this is a trend that's getting more and more popular. Instead of finding out the gender of their baby in the doctor's office during a sonogram, expectant couples ask their doctor to write the gender on a piece of paper and seal it in an envelope. Then, they deliver that envelope straight to their cake baker. The baker decorates the outside of the cake with a gender neutral design...but the inside? Is either PINK or BLUE!

(Photo from iVillage.com)

So the couple picks up the cake and takes it home to a party, usually filled with friends and family. When they cut the cake, everyone discovers at the same time whether they're having a boy or girl!

When Ph.D.-serts & Cakes opens its doors, we will definitely offer this service! In the meantime, if you are pregnant and want to try this, email me! Even if you live outside of Tampa, FL, I have ideas for how we can do this and ship the goods to you!

And, by the way, did you catch the big reveal of Ph.D.-serts & Cakes' website and logo on Facebook this week? If not, check it out at www.phdserts.com. The website is still under construction, but if it's anything like the amazing logo that Allison Anne Stevens Designs created for me, I know it'll be out of this world!

Tuesday, June 21, 2011

Princess Birthday Cake

Last weekend, I made my first cake in Tampa! It was only supposed to feed 25 people, but I hadn't touched a cake in weeks so I went a little overboard. I made it 2-tier, and it probably should have fed about 60 people. But, from what I'm told, there wasn't much cake leftover after the party so I guess they didn't mind!

The cake was for my mother-in-law's boss, Debi, who owns a clothing boutique called the Princess Boutique. They told me they wanted the cake decorated in shades of pink, topped with the Princess tiara, and to somehow incorporate high-heeled shoes.


princess cake silhouette stiletto tiara pink
So there you have it! I decided that using black silhouettes of the stilettos would look the most chic and help to contrast the "little girl" feel that the pinks & tiara were portraying. And I used the new Fabric Fondant & Gum Paste Mold from Wilton that I picked up a couple of weeks ago at the Wilton Food Blogger Workshop (stay tuned to see more of what I'm making with my loot).

But Debi wasn't the only one celebrating a princess' birthday last week! Our puppy Nani turned 4! In dog years, we're the same age now!

dog birthday cookie
Taylor and my mother-in-law brought Nani some goodies, including this adorable ice cream cone cookie for puppies!

dog birthday cookie
Nani was eager to please. Sit! Shake! Lay down!

dog birthday cookie
Then she carried the cookie around the house for a bit...

dog birthday cookie
...and finally settled down and smiled (or snarled?) for the camera.

Happy birthday, Debi & Nani!

Monday, June 6, 2011

Farm-Themed Birthday Cake

It's been quiet on the blog lately. There are a lot of exciting things going on in my life! I'll share some "sneak peeks" with you in a minute, but first let's talk CAKE! Here's a cute cake we just made for a 2nd birthday party.

farm animal boy birthday cake
They wanted it farm animal-themed so I made fondant cows and pigs and stuck them to the sides of the cake.

farm animal boy birthday cake
We also decorated with corn stalks, white fences, a farm tractor, and a huge #2 topper.

farm animal boy birthday cakefarm animal boy birthday cake
So, what's so exciting that it can possibly keep me from updating this blog regularly? Well, it involves moving, opening, birthing, and caking!

My family just relocated to Tampa so I can open my own custom cake shop. The cake shop is already in the works and I'm sure you'll read more about it on this blog. Be sure to stay tuned for the official unveiling of my new logo and website!

And, as you know already, I'm now 25 weeks pregnant with our first child! It's an exciting process and I'm loving every minute of it. Forgive me if setting up my baby girl's nursery occupies more of my time than it should. Some call it nesting...I think I'm just overly excited to welcome her to our family!

Last, but certainly not least, I'm gearing up to attend the Wilton Food Blogger Workshop in Chicago later this week! 27 food bloggers are going to be there, and I think if we find time to sleep, we'll be lucky. They're showing us the test kitchen, we're having cake decorating competitions (I'm game!), we're going to the annual Sidewalk Sale, etc, etc, etc. I'll definitely blog the whole adventure when I get home. There are so many things I'm looking forward to in this trip, but I'm definitely dying to meet the peeps behind Cake Spy and Cupcakes Take the Cake who will also be there! Woohoo! Wilton HQ, here I come!